SplashID for iPhone/iPod touch User
Guide
|
|
|
SplashID Safe provides quick and easy access to all of your personal
identification information, including usernames, passwords, credit
cards, PINs, calling card numbers, frequent flyer numbers, insurance
info and more. Data is stored in a secure, encrypted, password protected
format and can be synchronized between SplashID on your handheld and
SplashID on the desktop (Windows and Mac). You may prefer to do most
of your data entry in SplashID Desktop, however, since it's faster
and easier with a keyboard, and then synchronize the data with your
handheld.
Quick Start
- Launch SplashID and you will be asked to enter your email ID.
This is used both for activation purposes as well as to uniquely
identify your database with yourself.
- After the Getting Started guide completes, you will land on the Set
Password screen.
You can leave it blank to set no password if you wish, and you can
set a hint to remind you. You can also tap Pattern to draw a pattern
that you will use for login instead of a password.
- Next the List View will
be displayed with some sample records.
- Tap the New Button
 to
create a new record. In the Edit
Dialog select a Type, such as Credit
Card or Web Login, and you will see the Field
Labels
change accordingly. to
create a new record. In the Edit
Dialog select a Type, such as Credit
Card or Web Login, and you will see the Field
Labels
change accordingly.
- Tap Done when you are finished entering the information for the
new record and you have just created your first record.
- You can create records on the handheld or the desktop and synchronize
the data between the two. You may find it easier to enter data in
SplashID Desktop where you can use your keyboard.
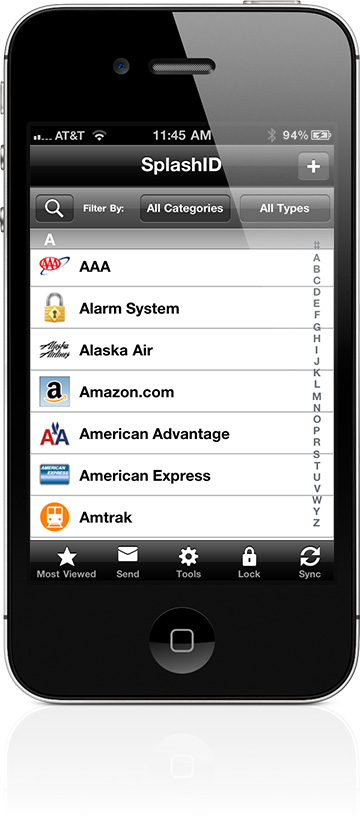
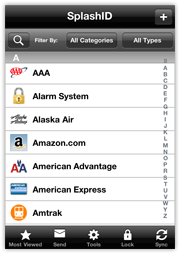
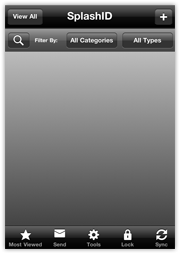
When you login to SplashID you are presented first with the List View.
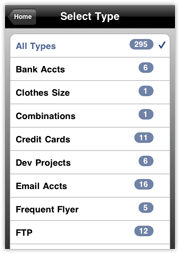
You can filter by Categories and Types tapping
the Filter By menus. In the filter selection screen, you will see a
list of your Categories or Types and how many records belong to each.
Panel View
Panel View |
The Panel View is an alternative way to browse your
SplashID records. Users of early versions of SplashID on iPhone
will remember this layout.
To switch to Panel View, go to Tools > Select View > Panel View.
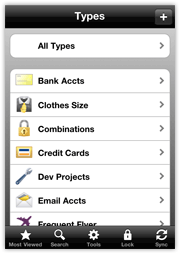
Instead of showing a list of records immediately, the Panel
View shows a list of Types and allows you to drill down by type.
Select All Types if you wish to see all records.
|
Search View
Panel View |
The Search View is another alternative way to
browse your SplashID records.
To switch to Panel View, go to Tools > Select View > Panel
View.
Unlike the List and Panel views, the Search View does not load
any records on launch. This makes for quicker access to very
large databases.
Once the application loads, you just tap the search button and
enter a some text to search on, then tap Search and the results
are displayed.
|
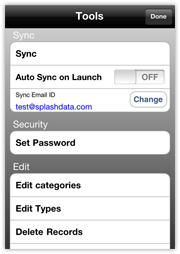
To open the Tools menus, tap the Tools button at the top right of
the screen (when available).
Tools Menu |
- Sync -- Opens the tool for synchronizing with
the SplashID desktop.
- Auto Sync on Launch -- With this feature enabled, SplashID
will attempt to sync with the desktop app every time you
open it.
- Sync Email ID -- This email ID should
match the desktop email ID with which you wish to synchronize
data.
- Set Password -- Select to edit the
password protecting SplashID. See Security for
more information.
- Login Lock Sound -- Turns on or off the click sound
that is played at login or locking.
- Edit Categories -- Displays the Categories which you
may
edit or delete. Select an existing type and tap edit, or
tap New to create a new one.
- Edit Types -- Displays the Types which you may edit or
delete. Select an existing type and
tap edit, or tap New to create a new one.
|
- Delete Records -- Displays a list of all
records, allowing you to select multiple (or all) records for
deletion.
- DeDupe -- Use this tool to search for duplicate
records and then delete them.
- Select View -- Switch between List
View and Panel View.
- Select Theme -- Select an alternating row
color and/or header and footer theme.
- Dynamic Search -- With Dynamic Search ON,
the Find tool will start filtering search results as you type.
When OFF, you must tap Search when you are done entering the
search terms.
- Allow File Transfers -- You can send records (individual or
groups) as secure files over Wi-Fi to other SplashID for iPhone
users. This preference must be on to allow the transfer.
- Clear Filters on Exit -- This preference, when enabled, will
reset the Category and Type filter selections when you exit the
application, so when you return all items will be displayed.
- About SplashID -- Displays the version info.
- Quick Start -- Launches the Quick Start guide
you saw the first time you ran the application.
- User Guide -- Web View of the online User
Guide.
- FAQs -- Web View of the online Frequently
Asked Questions.
- Send Feedback -- This tool is intended to be used to make suggestions
or feature requests. You will not get a reply to this email,
so if you need technical support, please submit
a ticket.
- Buy More Icons -- A great way to customize your database
even further - buy additional icon sets via In-App purchase.
- See More Apps -- We have lots of great iPhone apps available,
so please explore our catalog.
|
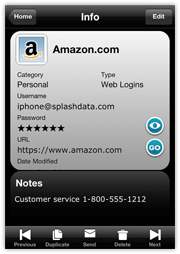 |
Tap a record item in the List View to view its
details in the Record Info. Each item can contain up to 9 fields,
a date modified field, an icon, plus additional notes (up to
4000 characters).
Some things to note about the Record Info screen:
- It is a read-only display. If you wish to edit the record,
tap the Edit button in the top right.
- Masked fields display stars instead of the field data to
protect you from over-the-shoulder snoops. Tap the masking
button to display its contents; tap again to re-mask.
- Tap a field to bring up the Copy option. Tap the Copy button
to copy the data to the clipboard, so you can paste it elsewhere.
|
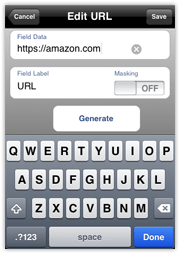
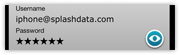
- Field data with valid URLs (beginning with http:// or www)
can be opened in the built-in browser by tapping the web button
next to the field data. The username and password will be auto-filled
into the appropriate fields if possible, and it is also displayed
at the top of the screen for reference.
- The Attachment field can be used to store any file you want
to associate with the record. Tap the field to view the attachment.
- You can use the buttons on the toolbar to skip to the previous
or next record, duplicate the record, email the record, or delete
the record.
- Notes data can be scrolled with the finger.
|
Edit Dialog
Enter the Edit Dialog for a given record by tapping the Edit button
in the Record Info or by creating a new record.

Edit Dialog |
Icon Picker |
Edit Field, Label & Masking |
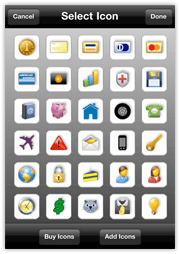
- Icon -- On the top left you will find the record
icon. Tap the icon button to access the Icon Picker. You can also
add custom icons on the SplashID desktop or on the handheld client,
and even buy additional icons via the Icon Picker on the handheld.
- Description -- Field 1 is where you enter the name or description
of the record.
- Category -- This field will default to the Category
you were displaying when you created the record. See more about Categories
and Types.
- Type -- This field will default to the Type you
were displaying when you created the record. The Type will dictate
the default field labels, icons, and masking preferences for the
record. See more about Categories
and Types.
- Fields -- Enter your data according to the field
labels.
- Field Tools -- Tap on the blue arrow button
 to
access the following field tools: to
access the following field tools:
- Custom Field Labels -- You may assign Custom
Field Labels or set the field labels
globally by going to Tools > Edit
Types.
- Masking -- You may switch on Masking for
a field at the record level or set the field masking globally
by going to Tools > Edit
Types.
- Password Generator -- Tap Generate to access
a strong password generator. See Automatic
Password Generator for more information.
- Attachments -- You can now attach files to records. Any file type
can be attached via the SplashID desktop, or you can use the camera
or photo library to add attachments on the iPhone.
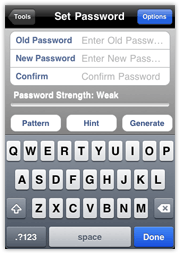
Automatic Password Generator
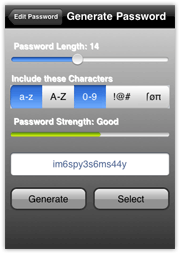
|
To invoke the Password Generator for a given
field, tap the field's blue arrow button to open the field tools,
and then tap Generate. The Generate button also appears in the Set
Password dialog in case you want the master
password to be very strong as well.
To create a password:
- Set the Length.
- Choose from the "Include these Characters" table one or more
options of letters, numbers, symbols, or a combination thereof.
The Strength meter will show you how strong the password will
be based on the selected attributes.
- Tap Generate. A password will be displayed for your review.
- Tap Generate again to generate a new one until you find one
you like.
- Tap Select when you have decided.
|
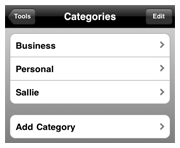
Edit Categories
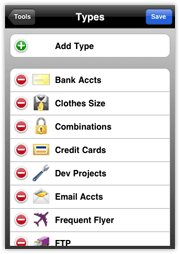
Edit Types
Define Type
|
Note: Only Categories and Types that contain
records are displayed. So if you create a new Category/Type,
it will not show up in the filter list until you create a new
record and select the new Category/Type, and save the record.
The difference between Categories and Types is best illustrated
by example. You may use Categories to separate your Business
records from your Personal records, while you use Types to
separate your Credit Card records from your Web Login records.
SplashID uses a "drill-down" system of displaying
your data. You drill down first through Categories, then Types,
then open a record to view its details.
Another way of looking at the Category/Type distinction is
by simile -- Your SplashID data is in a locked filing cabinet.
Each Category is a drawer, and each Type is a folder. Unlike
real world files, however, you can view all the records at
once if you wish, as if you emptied all folders and drawers
on the table and neatly laid them out for simultaneous viewing.
Categories act as filters for grouping related records. The
two pre-defined Categories are Business and Personal, though
you may add more by choosing Edit Categories from the Category
menu.
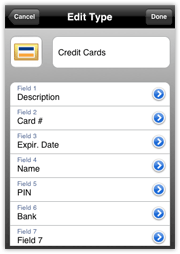
Types act as templates, which define the structure for the
items you want to store in SplashID. You may define up to 9
Custom field labels and a default icon for each type, as well
as specify the fields you wish to mask. For example, you may
create a type for Web Logins, which includes Custom field labels
for username, password and URL, with a globe icon, and the
password field masked; and you may create a Type for Credit
Cards which includes Custom field labels for credit card number,
expiration date and PIN, with a Visa icon, and the credit card
number and PIN masked.
- Edit Types -- Select Edit Types from the Tools menu
to display the Edit Types dialog. You may create an unlimited
number of Types. Several sample Types are provided, which
you may edit or delete. Tap an existing type to edit, or
tap New to create a new one. The Define type dialog is displayed.
- Define Type -- Enter a name for the Type and up
to 9 Custom field labels. The Mask switch specifies whether
or not the data in that field will be masked. And you may
also specify a default icon for the Type.
|
Custom Field Labels
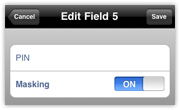
|
Field Labels and masking are set by default when
you define a Type. You may change
the Field Labels and masking, however, at the record level
in the Edit Field dialog.
|
Masking
|
Fields that are Masked appear as six stars -  .
You may show or hide the masked data by tapping the stars themselves. .
You may show or hide the masked data by tapping the stars themselves.
|
|
If you wish to permanently
mask or unmask a field, you can change its mask setting in the Edit
Type dialog or the Custom Field Labels dialog.
|
Set Password Dialog |
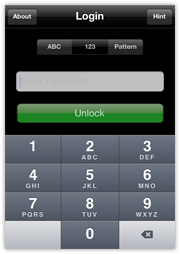
Enter Password Dialog |

Pattern Login |
You should secure your data in SplashID so that a password must be
entered to access the application. You will be required to enter the
password when launching SplashID. Once you set a password, SplashID
encrypts your data using 256-bit
Blowfish encryption to ensure data security.
- Setting a Password -- The Set Password dialog is displayed
by default the first time you run the application; you can also open
it from the Tools menu.
- Enter a password in the New Password field, and verify the
password by entering it again in the Confirm field.
- You can enter a hint to remind you of your password if you
forget.
- You can also use the password generator tool in this dialog,
but keep in mind that these are generally strong passwords and
difficult to remember.
Note: You must manually set the
same SplashID password on the handheld and the desktop,
if you wish to synchronize between the two.
- Setting a Pattern -- A more fun and convenient way to login is
using a pattern. To set a pattern, tap the Pattern button in the
Set Password dialog. Then draw your pattern using the numbered dots
supplied (no overlapping or repeating). Tap Continue and confirm
the pattern, then make a note of the numeric equivalent - this must
match the SplashID desktop if you plan on synchronizing. In version
6 of SplashID desktop, you can use a pattern to login as well.
- Entering a Password -- You will be required to enter your
password each time you launch SplashID, or when you turn on your
handheld if SplashID was last running when it was turned off.
- Changing a Password -- To change a password, select Set
Password from the Tools menu, enter your Old Password, then enter
and confirm the New Password.
- Removing a Password -- To remove a password, select Set
Password from the Tools menu, enter your Old Password, then leave
the New Password and Confirm fields blank.
Items may be created or edited on the Handheld or Desktop and the
changes can be synchronized over your local Wi-Fi network. You can download
the SplashID Safe desktop for Mac or Windows from www.splashdata.com/splashid/download/iphone.htm
By default information is synchronized in both directions, but you
can adjust the settings, in Sync settings which can be found in the
Options/Preferences dialog.
In most cases, you will wish to leave the Default setting (on the
right) set to Synchronize. This means that after changing it to Desktop
Overwrites Handheld and doing a sync, it will revert back to Synchronize
for the next sync so you don't have to go back in and change the setting
back manually.

Here are the possible sync settings and the results they will bring
about:
- Synchronize -- Changes made on the Handheld or the Desktop
will be synchronized. If a record is edited on both sides between
syncs, the latest edit will win.
- Desktop overwrites handheld -- All data on the Desktop is
copied to the handheld. Any data on the Handheld will be replaced.
- Handheld overwrites Desktop -- All data on the Handheld
is copied to the Desktop. Any data on the Desktop will be replaced.
In order to
synchronize, you must do the following:
- Turn WiFi on on your handheld device, then select the same network
that your computer is on for your handheld to join
- Open the SplashID desktop
- Select the correct user from the User menu in the SplashID desktop
to match the device name
- Set the passwords the same on both the desktop and handheld software
- Adjust the Sync settings in Options/Preferences > Sync if
you wish
- Start the Sync on the handheld:
1. Select "Sync" from Tools |
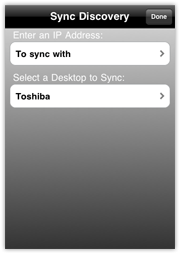
2. Select your computer or enter an IP address to sync with |
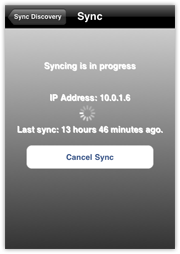
3. Tap "Start Sync" |
Manual IP Address Sync
If you have trouble connecting your handheld and desktop SplashID,
or if you want to want to sync remotely over the internet, you can
sync using a manual IP address.
To do this, open the Sync dialog on the handheld and tap where it
says Enter an IP Address "To sync with."
Enter the IP address of the desktop computer, either on the local
network or the public IP if connected directly to the internet. You
can find this IP address in the SplashID Desktop under Options/Preferences
> Sync.
Creating an Ad Hoc Network
If you have trouble connecting your handheld and desktop SplashID,
or if you want to make your sync connection with the handheld more
private, you can set up an Ad hoc network (aka Computer-to-Computer
network), and then perform your sync with both devices on that network.
Here's how:
Mac OS
- Click the Airport icon in the menu bar, and select Create Network.
- Select options for the network such as name and if you wish to
password protect it.
- On the handheld, join the new network from the list in Settings
> Wi-Fi.
- Now open SplashID on both the handheld and desktop and proceed
with the Synchronization.
Windows 7
- Follow the instructions here: http://windows.microsoft.com/en-US/windows7/Set-up-a-computer-to-computer-ad-hoc-network
- On the handheld, join the new network from the list in Settings
> Wi-Fi.
- Now open SplashID on both the handheld and desktop and proceed
with the Synchronization.
Windows Vista
- Follow the instructions here: http://windows.microsoft.com/en-US/windows-vista/Set-up-a-computer-to-computer-ad-hoc-network
- On the handheld, join the new network from the list in Settings
> Wi-Fi.
- Now open SplashID on both the handheld and desktop and proceed
with the Synchronization.
Windows XP
- Follow the instructions here: http://www.microsoft.com/windowsxp/using/networking/setup/adhoc.mspx#2
- On the handheld, join the new network from the list in Settings
> Wi-Fi.
- Now open SplashID on both the handheld and desktop and proceed
with the Synchronization.
|
You can share information with other SplashID
users in a few different ways:
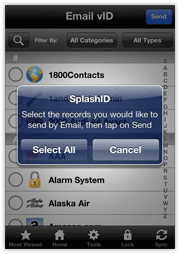
- Send Multiple Records -- When in the List
View, tap the Send button on the bottom toolbar, and then choose
whether to Select All or hit Cancel to select multiples manually.
Then you have the option to send via Email or To Device. Email
is best to send to the desktop. To Device can be used to send
records over Wi-Fi to a device on the same network.
- Send Single Record -- When viewing the Record
Info, tap the Send button on the bottom toolbar.
Then you have the option to send via Email as VID (encrypted),
via Email as Text (unencrypted), or To Device. Email is best
to send to the desktop. To Device can be used to send records
over Wi-Fi to a device on the same network.
|
Each time you sync with iTunes, the SplashID database file
on the handheld is backed up along with the rest of the device data.
In the event of a failure, this data can be restored via the Restore
option in iTunes sync.
The other better option to backup your iPhone SplashID data is to sync
with the SplashID Safe desktop. It is sold separately for $19.95 at www.splashdata.com/splashid/iphone
|