|
SplashID 3 User Guide

Table of Contents
Introduction
Installation
Registration
Quick Start
List View
Detail View
Edit View
Automatic Password Generator
Categories and Types
Custom Field Labels
Masking
Security
Importing Data
SplashID provides quick and easy access to all of your sensitive personal
identification information, including usernames, passwords, credit cards,
PINs, calling card numbers, frequent flyer numbers, insurance info and
more. Data is stored in a secure, encrypted, password protected format
and can be synchronized between SplashID on your Series 60 phone.
Connect your phone to your desktop computer. Double-click the SplashIDS60.SIS
file to install it on your phone.
When you launch SplashID you will be prompted to enter a registration
code or to run in Trial mode. You may run the software for 30-days in
full-functioning Trial mode. The Trial software and Registered software
are identical. Once the trial period ends you must purchase and enter
a registration code to continue using the software. You do not need
to re-install the software. Simply enter a registration code and your
Trial version will be converted into a Registered version and all your
data will remain intact.
Quick Start
- Launch SplashID and the List View will be
displayed with several sample records.
- Use the nav joystick to select a record, pressing the joystick to
view the record. Press the joystick to return to List View.
- Press the Options key on the bottom left of the screen and select
"Add item" to create a new record. In the Add Item View
select a Type, such as Credit Card or Web
Login, and you will see the Field Labels
change accordingly.
- Enter data for the record and select Done when you are finished.
List View |
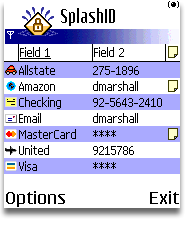
When you
launch SplashID you are presented with the List View, which displays
a list of your items. Items are records of information, like a
credit card number and expiration date; or a website username
and password.
List View Menu Options
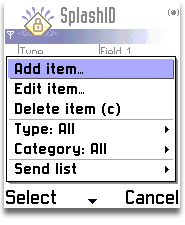
The List view contains the following menu commands
in the Options menu:
- Add Item -- Creates a new record.
- Edit Item -- Opens the Edit View for the
selected record.
- Delete Item -- Deletes the selected record.
You can also press the "C" key to delete a record.
- Type -- Select a Type
by which you wish to filter the list.
- Category -- Select a Category
by which you wish to filter the list.
- Send List -- Sends the records currently in view
to another phone. Note: The recipient must be running SplashID
in order to receive the records.
- Infrared Receive -- Turn on this setting
if wish to receive beamed records from another phone running
SplashID via Infrared.
- Set Password -- Select Set Password to password protect
SplashID. See Security for more information.
- Security Options -- Security Options allows you to
specify a period of time after SplashID becomes idle before
the application locks and requires a password. See Security
for more information.
- Mask/Unmask fields -- Shows or hides the
data in a masked field. You can also
press the "*" key to mask/unmask fields.
- Lock Now -- Locks SplashID immediately and requires
a password to open the data again. See Security
for more information. You can also press the "#"
key to Lock Now.
- Font -- Select a font style for the List View.
- Row Color -- You may select a custom row color for
the List View, or select white if you do not wish to have
a row color.
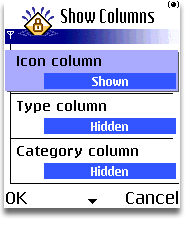
- Show Columns -- The Show Columns dialog lets you
select the columns to display in the List View; and whether
or not to display the Header Row. You can also set the sort
order for the list view in the Show Columns dialog. Note:
The column settings are remembered for each record Type. For
example, you can show two columns when viewing Web-Logins
and three columns when viewing Credit Cards.
- About SplashID -- Displays the version and registration
code.
- Exit -- Closes the SplashID application.
|
List View Menu Options |
Show Columns |
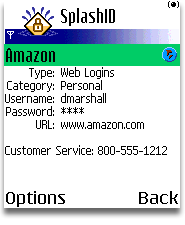
Select an item in the List View using the joystick to view its details
in the Detail View. Each item can contain up to 6 fields, an icon, plus
additional notes.
Use the joystick to scroll up or down through your records in Detail
View.
Detail View |
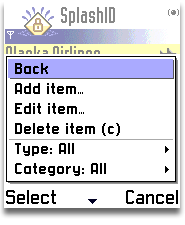
Display the Detail
View Options menu by pressing the left soft key. These options
will appear:
- Back -- Returns to the List View.
- Add Item -- Creates a new record.
- Edit Item -- Opens the Edit View for the
selected record.
- Delete Item -- Deletes the selected record.
You can also press the "C" key to delete a record.
- Send Item -- Sends the record currently in view to
another phone. Note: The recipient must be running SplashID
in order to receive the record.
- Infrared Receive -- Turn on this setting
if wish to receive beamed records from another phone running
SplashID via Infrared.
- Set Password -- Select Set Password to password protect
SplashID. See Security for more information.
- Security Options -- Security Options allows you to
specify a period of time after SplashID becomes idle before
the application locks and requires a password. See Security
for more information.
- Mask/Unmask fields -- Shows or hides the
data in a masked field. You can also
press the "*" key to mask/unmask fields.
- Lock Now -- Locks SplashID immediately and requires
a password to open the data again. See Security
for more information. You can also press the "#" key
to Lock Now.
- Font -- Select a font style for the Detail View.
- About SplashID -- Displays the version and registration
code.
- Exit -- Close the SplashID application.
|
Detail View Options |
Edit View
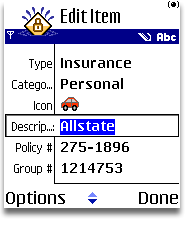
Select an item to edit, or select Add Item from the Options menu to
create a new record. You will find the following in the Edit View:
- Type -- Select the Type
of record and you will see the field labels change accordingly.
- Category -- Select the Category
to which you want the record to belong, such as Business or Personal.
- Icon -- Select the icon field to access the Icon
Picker.
- Field Data -- Enter the data for up to 6 fields.
- Notes -- Select the notes field and enter any text
that doesn't fit properly into one of the fields.
When you are finished entering your data in the fields, select Done.
Edit Item |
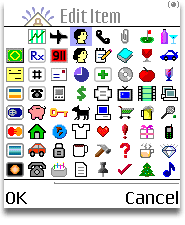
Icon Picker |
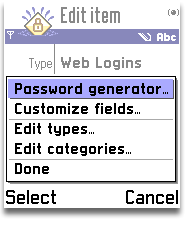
Options Menu |
The Options menu in the Edit view contains the following:
Password Generator -- Select to generate a
password based on criteria you define. See Automatic
Password Generator for more information.
|
Automatic Password Generator
|
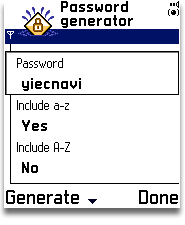
To display the Automatic Password Generator
in Edit View, select Password
Generator from the Options menu when you have a field
selected.
To create a password:
- Select one or more options of letters, numbers, symbols,
or a combination thereof.
- Set the Length.
- Check or Uncheck the pronounceable setting.
- Select Generate by pressing the left soft key. Select
Generate again until you get a suitable password.
- Select Done from the Options menu when you have decided.
|
|
Types and Categories
Types |
The difference between Categories and Types is best illustrated
by example. You may use Categories to separate your Business
records from your Personal records, while you use Types
to separate your Credit Card records from your Web Login
records.
Categories act as filters for grouping related records.
The two pre-defined Categories are Business and Personal,
though you may add more by choosing Edit Categories from
the Category menu.
Types act as templates, which define the structure for
the items you want to store in SplashID. You may define
up to 6 custom field labels and a default icon for each
type, as well as specify the fields you wish to mask.
For example, you may create a type for Web Logins, which
includes custom field labels for username, password and
URL, with a globe icon, and the password field masked;
and you may create a Type for Credit Cards which includes
custom field labels for credit card number, expiration
date and PIN, with a Visa icon, and the credit card number
and PIN masked.
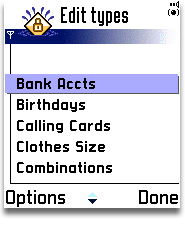
Edit Types -- Select Edit Types from the type menu
to display the Edit Types dialog. You may create an unlimited
number of Types. Several sample Types are provided, which
you may edit or delete. Select an existing type, press the
Options key and select edit, or select New to create a new
one. The Define type dialog is displayed.
|
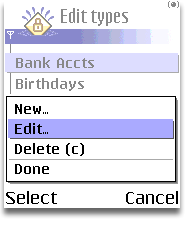
Edit Types |
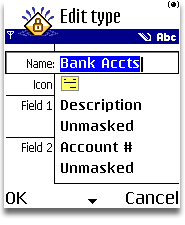
Edit Types Dialog |
Define
Type -- There are 3 details to define about a Type:
- Info -- Enter a name for the Type, and the field label
names.
- Icon -- Choose a default Icon to be associated with
the Type.
- Mask -- Select Masked or Unmasked
after each field label.
|
|
Default Types
SplashID includes the following built-in Types, which may be modified
or deleted:
| |
Type |
Field 1 |
Field 2 |
Field 3 |
Field 4 |
Field 5 |
Field 6 |

|
Bank Accounts |
Description |
Account # |
PIN |
Name |
Branch |
Phone # |

|
Birthdays |
Description |
Date |
|
|
|
|
 |
Calling Card |
Description |
Access # |
PIN |
|
|
|
 |
Clothes Size |
Description |
Shirt size |
Pant size |
Shoe size |
Dress size |
|

|
Combinations |
Description |
Code |
|
|
|
|

|
Credit Cards |
Description |
Card # |
Expir. Date |
Name |
PIN |
Bank |

|
Email Accts |
Description |
Username |
Password |
POP3 Host |
SMTP Host |
|
 |
Emergency Info |
Description |
Phone # |
|
|
|
|
 |
Frequent Flyer |
Description |
Number |
Name |
Date |
|
|

|
Identification |
Description |
Number |
Name |
Date |
|
|
 |
Insurance |
Description |
Policy # |
Group # |
Insured |
Date |
Phone # |
 |
Memberships |
Description |
Acct # |
Name |
Date |
|
|
 |
Phone Numbers |
Description |
Phone # |
|
|
|
|

|
Prescriptions |
Description |
Rx # |
Name |
Doctor |
Pharmacy |
Phone # |
 |
Serial Numbers |
Description |
Serial # |
Date |
Reseller |
|
|

|
Vehicle Info |
Description |
License # |
VIN # |
|
|
|

|
Voice Mail |
Description |
Access # |
PIN |
|
|
|

|
Web Logins |
Description |
Username |
Password |
URL |
|
|
Custom Field Labels
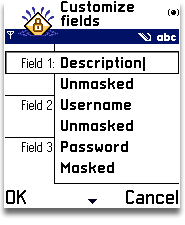
|
When you create a record, the field labels
and mask settings are defined by its Type.
You may change the Field Labels and masking, however, on
a record by record basis by selecting Customize Fields from
the Options menu in the Edit View.
|
|
Masking
|
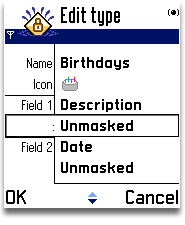
Fields that are Masked appear as four asterisks
(****). You may show or hide the masked data by selecting
Mask/Unmask data from the Options menu, or by pressing the
"*" key on the keypad.
If you wish to permanently mask or unmask a field for a
given Type, you can change its mask setting in the Edit
Type dialog.
If you wish to change the mask settings for the given record,
you can do this in the Custom Field
Labels dialog.
|
|
You can secure your data in SplashID so that a password must be entered
to access the application. You will be required to enter the password
when launching SplashID, or when waking your phone if SplashID was last
running when it went to sleep. Once you set a password, SplashID encrypts
your data using Blowfish encryption to ensure data security.
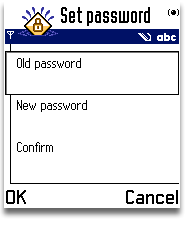
- Setting a Password -- To set a password, select Set Password
from the Options Menu in either the List View or Detail View. The
Set Password dialog is displayed. Enter a password in the New Password
field, and verify the password by entering it again in the Confirm
field.
- Entering a Password -- You will be required to enter your
password each time you launch SplashID, or when you next use your
phone if SplashID was last running when it became idle.
- Changing a Password -- To change a password, select Password
from the Options Menu, enter your Old Password, then enter and confirm
the New Password.
- Removing a Password -- To remove a password, select Set Password
from the Options Menu, enter your Old Password, then leave the New
Password and Confirm fields blank.
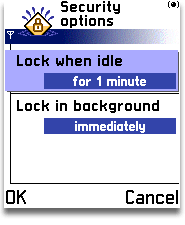
Security Options -- Choose Security Options from the
Options menu to specify the period of time that must elapse before SplashID
auto-locks. Once SplashID locks, you must enter your password to open
SplashID. There are two settings for the Security Options:
- Lock when idle -- When the phone becomes
idle, SplashID will lock immediately by default.
- Lock in background -- If you switch to another
application, SplashID will lock immediately by default.
If you wish, you may specify a longer delay, at the risk of less security.
If you have specified a longer delay (e.g., 10 minutes) but then desire
to lock SplashID immediately, you may select Lock Now from the Options
Menu (or press the "#" key).
Importing Data
The SplashID Standalone Desktop is included with your purchase
of SplashID for Series 60. You can download it here:
SplashID Password Manager Standalone Desktop
To import data from the Palm (or other) version:
- Launch SplashID Desktop for Palm OS.
- Select File > Export > SplashID
VID and save the records. Password is optional.
- Launch SplashID Standalone
Desktop.
- Select File > Import > SplashID vID and select the
file you exported in step 2.
The Series 60 version of SplashID does not synchronize with
the SplashID desktop like the other platform versions at this time.
This version can, however, import vID files from internal
memory or a card. We suggest using the card method as it's easier to
navigate to the file.
To import a vID file via the card do the following:
- Export a vID file from File > Export in SplashID desktop
- Copy the vID file from SplashID desktop to a memory card
- Insert the card in your device and choose Import... from the Options
menu. The card is E.
If you Bluetooth the file to the device, it'll be in:
C:\system\Mail\<cryptic folder name>\<subfolder>\vID file
name
|


