IntroductionSplashMoney is a personal finance application for Palm OS and Windows that allows you to:
InstallationLaunch the SplashMoney Installer and follow the on screen instructions. You will be required to HotSync your Handheld to complete the installation. The installer installs the following files:
Launch SplashMoney RegistrationWhen you launch SplashMoney, you will be prompted to enter a registration code or to run in Trial mode. You may run the software for 30-days in full-functioning Trial mode. The Trial software and Registered software are identical. Once the trial period ends you must purchase and enter a registration code to continue using the software. You do not need to re-install the software. Simply enter a registration code and your Trial version will be converted into a Registered version and all your data will remain intact. Quick Start
Accounts
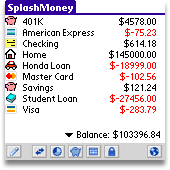
Account View When you first launch SplashMoney you are presented with the Account View. Several sample accounts will appear. You can edit these accounts or create new ones. SplashMoney supports the following account types:
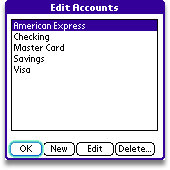
Editing Accounts You may create new accounts or edit existing ones as follows:
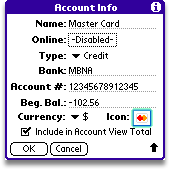
Account Info You can create an unlimited number of accounts. The Account Info dialog lets you enter the following information:
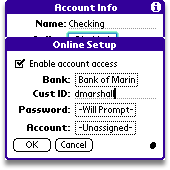
Online BankingSplashMoney can connect to many online banks using OFX "Direct Connect" technology. Ask your bank if you are able to use their online service with Direct Connect. They will probably want to hear that you are using it with Quicken 2000 or later, since many banks have business relationships with Quicken. But in most cases, if it works with Quicken, it will work with SplashMoney since we are employing the same technology. In order to use Online Banking on the handheld, you need a wireless enabled handheld with Palm OS 5.2 or later. To find out your OS version, select Info from the App menu in the application launcher (home); then select the Version tab.
Note: In some cases the username/password you use to log into your bank's web-site is different than the username/password required for "direct connect" online banking as found in SplashMoney and Quicken. Check with your financial institution to see if you need a special username/password for direct connect online banking and whether any fees apply. Once you have set up an account for online access, you can tap the
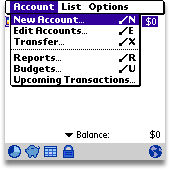
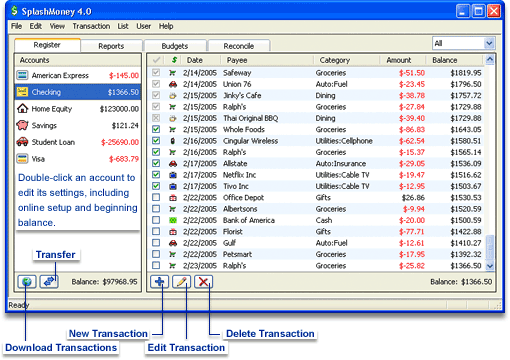
Go Online button Note: When transactions are downloaded from your bank SplashMoney will attempt to match those transactions with any existing transactions in your register, or will add them as New transactions. You will be prompted to Review the downloaded transactions and verify whether they are Matching or New transactions. RegisterRegister View Once your are finished editing your accounts, return to the Account View and tap an Account to display its Register View. The Register view displays a list of transactions. The following buttons are available in the toolbar in the Register View:
These other commands are also available in the Register View:
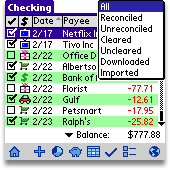
Status Filter
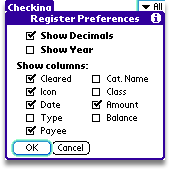
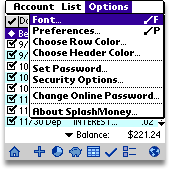
You can customize the appearance of the Register View by changing the columns shown, showing/hiding decimals and changing the font size.
Font
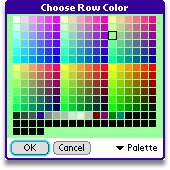
Row/Header Colors
Transactions
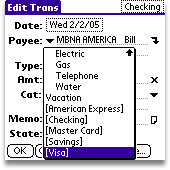
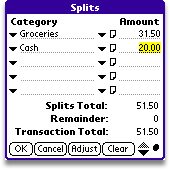
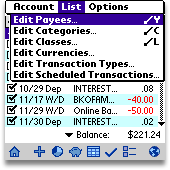
Type: Type of transaction (check, deposit, withdrawal, ATM, etc.). Note: if you choose check#, the next check number will be automatically entered but you can change the check number if desired. You may also create custom transaction types (see Transaction Types). Amt: The amount of the transaction. The amount is recorded in your home currency, known as your base currency. You may enter a foreign currency and its exchange rate by tapping the Currency Converter (X) icon (see Multiple Currencies). Cat: You may enter a Category (e.g., Auto, Dining, Groceries, etc.) and/or Class (e.g., Personal, Business, etc.) in the Category field. Just as in Quicken and Microsoft Money, Categories and Classes are separated by a slash (/) and you can also split a transaction over multiple Categories and Classes by selecting SPLIT from the Category popup menu. You may enter the Category and Class using graffiti or select from the popup menus of memorized items (see Auto-Fill). The Category menu appears on the left and the Class menu appears on the right. SplashMoney includes predefined categories and classes, which you can modify. You may also transfer money to another Account by selecting the Account name enclosed in brackets (e.g., [Visa]) from the bottom of the Category menu (see Category Transfers). Memo: Enter a memo, or tap the memo icon to enter more information. State: Select the state of your transaction: Uncleared if the transaction has yet to clear your bank, Cleared, Reconciled if the transaction has been verified against your statement, and Void to disallow the transaction (see Balancing Accounts). Delete: This button only appears when editing an existing transaction (see Deleting Transactions). Purge: This button only appears when editing an existing transaction (see Purging Transactions). Using Auto-FillSplashMoney makes it easy to enter transactions that occur frequently. It remembers transactions you've entered previously and auto-fills them for you, as follows:
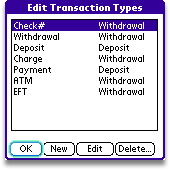
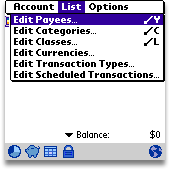
Transaction Types
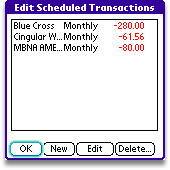
Scheduled TransactionsSplashMoney supports Scheduled Transactions, enabling you to setup transactions that occur on a regular basis. Once you setup a Scheduled Transaction, you can choose to record it manually, automatically, or be reminded when it's time to record the transaction. Creating/Editing Scheduled Transactions
Select Edit Scheduled Transactions from the List Menu or tap the Schedule
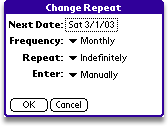
button: Tap New. The Edit Scheduled Transaction dialog appears. Enter the Account this transaction will affect from the Acct popup menu. Tap the Date picker to open the Change Repeat dialog and specify the date and frequency of the transaction (see Repeat Frequency below). Complete the rest of the fields in the dialog (Payee, Type, Amount, Category, etc.) and tap OK to complete the setup of the scheduled transaction. Repeat Frequency There are several options available for the frequency of Scheduled Transactions and how you want to enter them in your register, as follows: Next Date: The date of the next (or first) occurrence. Frequency: Monthly, Twice a month, Quarterly and so on. Repeat: Select Indefinitely for a transaction that is ongoing (e.g., Cable TV) or # of Times for a transaction that occurs a specified number of times (e.g., car loan or mortgage). Enter: Choose one of the following options for how you want the scheduled transaction to be entered into your account register:
Recording Scheduled Transactions
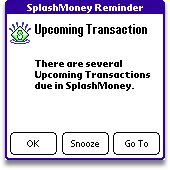
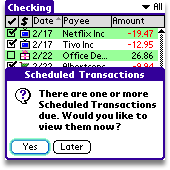
Depending on how you choose to enter scheduled transactions you will receive one or more of the following alerts: Reminder: If you selected Remind Me as the entry method, a Reminder alert will display when specified, even when you are not running SplashMoney. Tap OK to dismiss the alert, Snooze to snooze it for 5 minutes, or Go To to open the Upcoming Transactions dialog to manually record it. Note: Tapping OK in the Reminder dialog will not enter the transaction, it will only dismiss the alert. You must record the transaction manually in the Upcoming Transactions dialog (see Upcoming Transactions dialog below). Scheduled Transactions prompt: If you have one or more transactions that are due you will be prompted to view them when you launch SplashMoney. If you tap Yes, you will be taken to the Upcoming Transactions dialog where you can record them. If you tap Later, you will be reminded again the next time you launch SplashMoney. Upcoming Transactions dialog: You may view and record scheduled transactions by selecting Upcoming Transactions from the Account Menu. The Upcoming Transactions dialog displays all scheduled transactions thru the date specified in the Thru popup menu. You may select a scheduled transaction and tap one of the following buttons:
Transferring funds between Accounts
You may transfer funds between your accounts using one of the following methods. Transfer Funds Tap the Transfer button Date: Enter the date of the transaction. From: The Account the funds will be withdrawn from. Amount: The amount of the transfer. To: The Account the funds will be deposited into. Cleared: Whether or not the Transfer is cleared. (Chances are the transfer has cleared your bank since they probably conducted the transfer. But you can always mark it as cleared later when reconciling your account.) SplashMoney displays the name of each Account in brackets at the end of the Category list (similar to Quicken and Microsoft Money). This enables you to transfer funds to an account from within the Edit Transaction dialog. For example, when writing a check for your Visa bill, you could create a new transaction in your Checking account and select [Visa] from the Category popup. This will create a corresponding deposit in the Visa account in the same amount. These two corresponding transactions are dynamically linked and if you change the data in one, it will be reflected in the other. Split Transactions
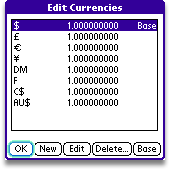
Multiple CurrenciesSplashMoney supports multiple currencies allowing you to track accounts in different currencies as well as recording individual transactions in different currencies and converting them to your account currency. You must specify a Base Currency, and all other currencies will have a conversion rate relative to the Base Currency. Each account can use a different Account Currency, but there is only one Base Currency. In the Account View, each account balance is displayed in its own currency. But the Total Balance (Net Worth) at the bottom of the Account View is calculated by converting each account total to the base currency and summing the account totals.
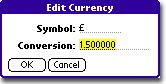
Editing Currencies You may create up to 15 currencies, each with its own conversion rate. One currency must be defined as your Base Currency with a conversion rate of 1.0. All other currency conversion rates will be in relation to the Base Currency. Conversion rates are dynamically updated as you create new transactions and edit the Conversion rate in the Set Currency dialog, discussed below. To edit/create a Currency:
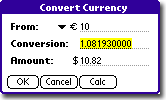
Entering a Foreign Currency in a Transaction While entering a transaction in the Edit Transaction dialog, click the Currency Converter icon (X), which appears to the right of the Amount Field.
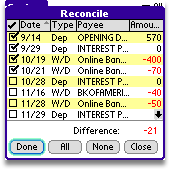
Since conversion rates change daily, they can be edited while entering a transaction in the Convert Currency dialog. When you edit the conversion rate for a transaction, you are only editing the conversion rate for that specific transaction. It will not affect the conversion rate for any previously entered transactions. When you enter future transactions, however, the last conversion rate entered for that currency is recalled. Balancing AccountsYou can balance your SplashMoney account so that it matches the closing balance on your bank statement using one of the two following methods: Reconciling
A note about the difference between Balance and Cleared Ending balances:
Finding Transactions
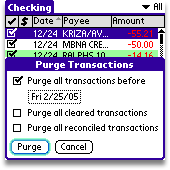
Deleting TransactionsSplashMoney provides several methods for removing transactions, each with unique characteristics, as follows: Deleting Transactions When you delete a transaction it removes it from your register and it is no longer calculated into your account balance. You should not delete valid transactions as it will alter your balance and potentially cause problems when reconciling. It is recommended that you purge valid transactions instead.
Purge Before: As an alternative to purging all cleared or reconciled items, you may wish to keep several months worth of transactions on your handheld for your records. Using the Purge Before command you can purge transactions before a specified date. Note: Any items that are purged will be automatically cleared and your Beginning Balance will be adjusted so that the Ending Balance will remain accurate. Purge Cleared: SplashMoney will remove the cleared transactions from your register and adjust your Beginning Balance by the total amount of the purged transactions, so that your Ending Balance will remain accurate. Purge Reconciled: SplashMoney will remove the reconciled transactions from your register and adjust your Beginning Balance by the total amount of the purged transactions, so that your Ending Balance will remain accurate. If you void a transaction, the transaction will remain in your register, so you have a record of it, but its amount will be ignored and not calculated in your account balance. Reports and Charts
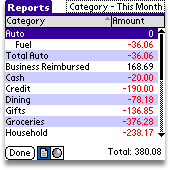
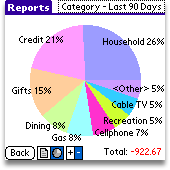
Report View SplashMoney will generate reports showing how you are spending your
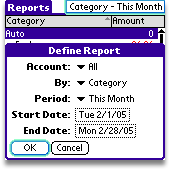
money over a specified period of time. Tap the Reports button Pie Chart View Tap the Pie Chart button Define Report You may customize the report by tapping the text on the top right of the screen, which opens the Define Report dialog. In this dialog you can specify which Accounts to include, the type of report (Payee, Category or Class), and the time period. Drill-down Report In either the Report View or Pie Chart View, you may drill-down on any item in the report by tapping on it. For instance, if you are viewing a report by Category, you can tap "Groceries" to generate a Drill-down report showing all the transactions that are assigned to the Groceries category in that time period. Tip: You can find all the transactions that are not categorized by generating a Category Report and tapping the total for <Unassigned>. This will create a Drill-down report for all the Uncategorized transactions. You can then open each transaction and assign categories to them. Budgets
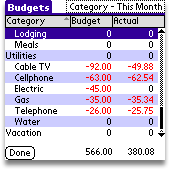
Budget View SplashMoney allows you to view reports comparing budgeted amounts to
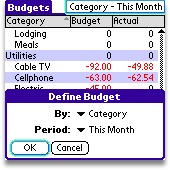
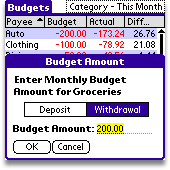
actual amounts. Tap the Budget button Define Budget You may specify the Budget type by tapping the text on the top right of the screen, which opens the Define Budget dialog. In this dialog you can specify the Budget type (Payee, Category or Class), and the time period. Budget Preferences You may specify which columns to show in the Budget view by selecting Preferences from the Options menu. Budget Amount You specify the budget amount for each item (Category, Class or Payee) by tapping on the Budget Amount in the Budget column. This will open the Budget Amount dialog where you specify a monthly budget amount for that item. Note: You may only specify a monthly budget amount for each item. When you are viewing a budget report for a time period of a Quarter, the monthly amount will be multiplied by three, and when viewing by a time period of a Year, the monthly amount will be multiplied by 12. Drill-down Report If you tap the item name (Category, Class or Payee) in the Budget view, it will open the Drill-Down Report for that item. The drill-down report will show all the transactions associated with that item in that time period (Month, Quarter or Year). Security
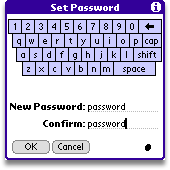
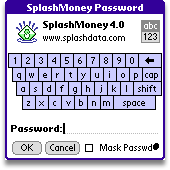
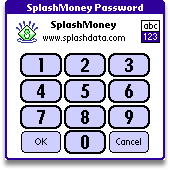
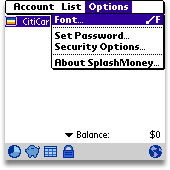
You can secure your data in SplashMoney so that a password must be entered to access the application. You will be required to enter the password when launching SplashMoney, or when you turn on your handheld if SplashMoney was last running when it was turned off. Setting a Password -- Select set a password from the Account View Options Menu. The Set Password dialog is displayed. Enter a password in the New Password field, and verify the password by entering it again in the Confirm field. Entering a Password -- You will be required to enter your password each time you launch SplashMoney, or when you turn on your handheld if SplashMoney was last running when it was turned off. You may enter the password using Graffiti, or with one of the onscreen keyboards. You may toggle between the alpha-numeric keyboard and the numeric keypad using the abc/123 button on the top right of the password dialog. The numeric keypad is suitable for entering a numeric password without a stylus, using your fingers. Changing a Password -- To change a password, select Set Password from the Account View Options Menu, enter your Old Password, then enter and confirm the New Password. Removing a Password -- To remove a password, select Set Password from the Account View Options Menu, enter your Old Password, then leave the New Password and Confirm fields blank.
Menu Commands
Register View Menus The following menus appear in the Register View:
Account
List
Options
Account View Menus The following menus appear in the Account View:
Account
List
Options
Custom IconsSplashMoney includes a built-in set of icons to choose from. In addition, SplashMoney supports custom icons which are available from third-party vendors, as well as icons created with icon editing applications like Icon Manager.
SplashMoney Desktop ApplicationRegisterThe SplashMoney Desktop replicates all of the functionality of the handheld application, with a few cosmetic differences. Tabs are used on the desktop to allow quick access to the Register, Reports, Budgets, and Reconcile tool. The Account View on the handheld application is constantly available in the Accounts pane on the left of the desktop application. |
||||||||||||||||||||||||||||||||||||||||||||||||||||||||||||||||||||||||||||||||||||||||||||||||||||||||||||||||||||||||||||||||||


 Security
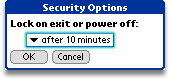
Options -- Choose Security Options from the Options menu to
specify the period of time that must elapse before SplashMoney auto-locks.
Once SplashMoney locks, you must enter your password to open SplashMoney.
The default setting will immediately auto-lock SplashMoney when you
exit the application or turn off your handheld. If you wish, you may
specify a longer delay, at the risk of less security. If you have specified
a longer delay (e.g., 10 minutes) but then desire to lock SplashMoney
immediately, you may select Lock Now from the Options Menu.
Security
Options -- Choose Security Options from the Options menu to
specify the period of time that must elapse before SplashMoney auto-locks.
Once SplashMoney locks, you must enter your password to open SplashMoney.
The default setting will immediately auto-lock SplashMoney when you
exit the application or turn off your handheld. If you wish, you may
specify a longer delay, at the risk of less security. If you have specified
a longer delay (e.g., 10 minutes) but then desire to lock SplashMoney
immediately, you may select Lock Now from the Options Menu.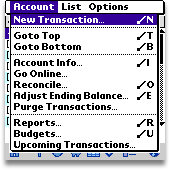
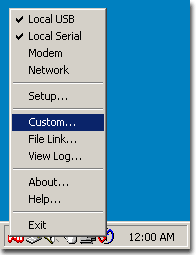 |
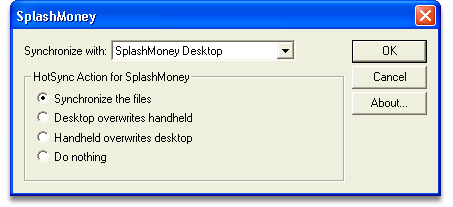
Opening the SplashMoney Conduit To open the SplashMoney Conduit, do the following: Click the HotSync Manager icon in the Windows system tray and select Custom to open the Custom dialog. (On Macintosh: Launch HotSync Manager and select Conduit Settings from the HotSync menu.) Double click the SplashMoney entry in the Conduit list. The SplashMoney Conduit Dialog appears. The following conduit setting options are available for the default setting, which is "Synchronize with SplashMoney Desktop": |
 |
|
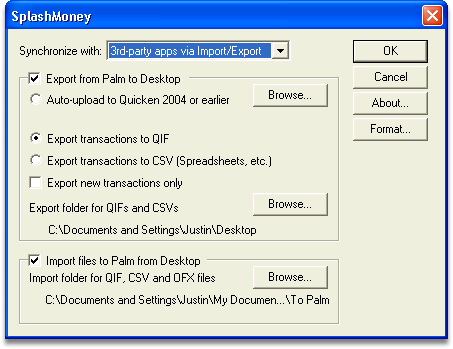
3rd-party apps via Import/Export Select "3rd-party apps via Import/Export" if you wish
to export transactions created in SplashMoney to the Desktop during
each HotSync. Transactions created in SplashMoney can be exported
to the desktop and imported into Quicken, Microsoft Money or a
spreadsheet. Which of the above options you should choose
depends on what application you will be transferring the transactions
to on the desktop. See the following links for more info: |
|
Using SplashMoney with Quicken 99 or later for Windows
Using SplashMoney with Quicken 98 or earlier for Windows, or Quicken for Macintosh
Using SplashMoney with Microsoft Money
Using SplashMoney with a spreadsheet, database or word processor
Import files to Palm from Desktop
If you have existing data (Accounts, Transactions and Categories) in Quicken, Microsoft Money, or an online bank, you can transfer this data into SplashMoney by importing a QIF, CSV or OFX file. See the following links for more info:
Importing data into SplashMoney from Quicken
Importing data into SplashMoney from Microsoft Money
Importing data into SplashMoney from an online bank
Using SplashMoney with Quicken 99 or later for Windows
You may use SplashMoney primarily to record transactions while on the go and then automatically upload those transactions into Quicken on the desktop. SplashMoney does not synchronize with Quicken, but it does allow you to automatically upload transactions to Quicken so that you don't have to re-enter transactions on the desktop that were created on the handheld. To automatically upload transactions to Quicken, follow these steps:
Upload transactions direct to Quicken - Select "Upload transactions direct to Quicken" in the SplashMoney Conduit to automatically transfer all transactions created or modified in SplashMoney to Quicken on the desktop. This feature is only available in Quicken 99 or later for Windows. If you are using an earlier version of Quicken, or Quicken for Macintosh, see Using SplashMoney with Quicken 98 or earlier for Windows, or Quicken for Macintosh. In order to upload transactions direct to Quicken, SplashMoney must know the location of the Quicken application (QW.EXE) folder. This location will be detected automatically, however, you may change the location by clicking the top Browse button in the SplashMoney Conduit if SplashMoney was not successful in locating the Quicken Application folder on your desktop.
HotSync - HotSync your device. SplashMoney will transfer any new transactions that have been created in SplashMoney since the last HotSync to the desktop. Note: You must name your accounts in SplashMoney the same as your accounts in Quicken. Also, only new or modified transactions created on the handheld since the last HotSync will be transferred. You may wish to create a new "Test" transaction on the handheld and then perform a HotSync to verify that it is working. Last, you must exit Quicken prior to performing a HotSync or the transactions will not be transferred.
Launch Quicken - The next time you launch Quicken the transactions created with SplashMoney will be automatically imported into Quicken and you will be prompted to match them with existing transactions. Note: you don't have to launch Quicken each time you HotSync; the new transactions created in SplashMoney will accumulate and then be uploaded the next time you launch Quicken.
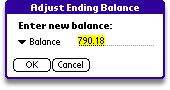
Adjust SplashMoney Ending Balance - The SplashMoney Conduit
only uploads transactions created in SplashMoney to Quicken and does
not transfer transactions in the other direction - from Quicken to SplashMoney.
Therefore, after transferring transactions from SplashMoney to Quicken
you may wish to update the ending balance in SplashMoney so it matches
the ending balance in Quicken. To do so, in SplashMoney, tap the
ending balance amount that appears on the bottom of the Register
View, and enter the balance amount that appears in Quicken.
Optional: If you want the SplashMoney register to match Quicken
exactly, including a history of all transactions, you may
delete your Accounts in SplashMoney and import all the data from
Quicken into SplashMoney following the steps outlined in Importing
data to SplashMoney from Quicken. However, this step is not recommended
as it is time consuming, and manual. It is recommended that you just
keep the balance updated in SplashMoney, as explained above, rather
than a complete history of transactions.
Using SplashMoney with Quicken 98 or earlier for Windows, or Quicken for Macintosh
You may use SplashMoney primarily to record transactions while on the go and then import those transactions into Quicken on the desktop via QIF files. SplashMoney does not synchronize with Quicken, but it does allow you to automatically generate a QIF file that can be imported into Quicken so that you don't have to re-enter transactions on the desktop that were created on the handheld. To do so, follow these steps:
Export transactions to QIF - Select "Export transactions
to QIF" in the SplashMoney Conduit. This
option will automatically export transactions from each of your SplashMoney
accounts to a QIF file, which can then be manually imported into Quicken.
Each time you perform a HotSync, any SplashMoney Accounts containing
new or modified transactions will be written to the desktop in QIF format.
You must specify a location where QIF files from SplashMoney will be
stored. The default location is C:\My Documents\SplashMoney\From Palm;
however, you may change the location by clicking the Browse button,
if desired. (Mac location: SplashMoney/From Palm.)
HotSync - HotSync your device. SplashMoney will transfer any new transactions that have been created in SplashMoney to the desktop. Each time you HotSync any new transactions are appended to the existing QIF files, or new files are created if they do not already exist. Note: you don't have to launch Quicken each time you HotSync; the new transactions created in SplashMoney will accumulate in the QIF file.
Import QIFs into Quicken - Launch Quicken and select Import from the File Menu, and make the following selections:

Quicken Import Dialog
- QIF File to Import: Click the Browse button and select the QIF file you wish to import in the SplashMoney "From Palm" folder.
- Quicken Account to Import into: Specify the Account you wish to import the transactions into.
- Include in Import: Select "Transactions" only. Note: Make sure "Special handling for transfers" is not selected.
Delete QIFs - After successfully importing the QIF files into Quicken, you must delete the QIF files in the "From Palm" folder. Then, the next time you HotSync, SplashMoney will create new QIF files containing only new transactions. If you don't delete the QIF files, the next time you import the QIF into Quicken, you will end up with duplicate transactions.
Adjust SplashMoney Ending Balance - After transferring transactions
from SplashMoney to Quicken you may wish to update the ending balance
in SplashMoney so it matches the ending balance in Quicken. To do so,
in SplashMoney, tap the ending balance
amount that appears on the bottom of the Register View, and enter the
balance amount that appears in Quicken.
Optional: If you want the SplashMoney register to match Quicken
exactly, including a history of all transactions, you may
delete your Accounts in SplashMoney and import all the data from
Quicken into SplashMoney following the steps outlined in Importing
data to SplashMoney from Quicken. However, this step is not recommended
as it is time consuming, and manual. It is recommended that you just
keep the balance updated in SplashMoney, as explained above, rather
than a complete history of transactions.
Using SplashMoney with Microsoft Money
You may use SplashMoney primarily to record transactions while on the go and then import those transactions into Microsoft Money on the desktop via QIF files. SplashMoney does not synchronize with Microsoft Money, but it does allow you to automatically generate a QIF file that can be imported into Microsoft Money so that you don't have to re-enter transactions on the desktop that were created on the handheld. To do so, follow these steps:
Export transactions to QIF - Select "Export transactions
to QIF" in the SplashMoney Conduit. This
option will automatically export transactions from each of your SplashMoney
accounts to a QIF file, which can then be manually imported into Microsoft
Money . Each time you perform a HotSync, any SplashMoney Accounts containing
new or modified transactions will be written to the desktop in QIF format.
You must specify a location where QIF files from SplashMoney will be
stored. The default location is C:\My Documents\SplashMoney\From Palm;
however, you may change the location by clicking the Browse button,
if desired. (Mac location: SplashMoney/From Palm.)
HotSync - HotSync your device. SplashMoney will transfer any new transactions that have been created in SplashMoney to the desktop. Each time you HotSync any new transactions are appended to the existing QIF files, or new files are created if they do not already exist. Note: you don't have to launch Microsoft Money each time you HotSync; the new transactions created in SplashMoney will accumulate in the QIF file.
Import QIFs into Microsoft Money - Launch Microsoft Money and select Import from the File Menu and locate the QIF file(s) in the SplashMoney "From Palm" folder.
Delete QIFs - After successfully importing the QIF files into Microsoft Money, you must delete the QIF files in the "From Palm" folder. Then, the next time you HotSync, SplashMoney will create new QIF files containing only new transactions. If you don't delete the QIF files, the next time you import the QIF into Microsoft Money, you will end up with duplicate transactions.
Adjust SplashMoney Ending Balance - After transferring transactions
from SplashMoney to Microsoft Money you may wish to update the ending
balance in SplashMoney so it matches the ending balance in Microsoft
Money . To do so, in SplashMoney, tap the
ending balance amount that appears on the bottom of the Register
View, and enter the balance amount that appears in Microsoft Money .
Optional: If you want the SplashMoney register to match Microsoft
Money exactly, including a history of all transactions, you may
delete your Accounts in SplashMoney and import all the data from
Microsoft Money into SplashMoney following the steps outlined in Importing
data to SplashMoney from Microsoft Money. However, this step is
not recommended as it is time consuming, and manual. It is recommended
that you just keep the balance updated in SplashMoney, as explained
above, rather than a complete history of transactions.
Using SplashMoney with a spreadsheet, database or word processor
You may use SplashMoney as your primary financial management application to record transactions, reconcile your bank statements and view reports. In this scenario, you may use the SplashMoney Conduit primarily for archiving or printing a history of your transactions on the desktop using a spreadsheet, database or word processor. To do so, follow these steps:
Export transactions to CSV - Select Export transactions to CSV in the SplashMoney Conduit if you wish to export each of your SplashMoney accounts to a CSV file. CSV stands for Comma Separated Values, and is a common file format that can be read by a spreadsheet, database or word processor. You must specify a location where CSV files from SplashMoney will be stored. The default location is C:\My Documents\SplashMoney\From Palm; however, you may change the location by clicking the Browse button, if desired. (Mac location: SplashMoney/From Palm.)
HotSync -- HotSync your device. Each time you perform a HotSync, a CSV file for each account is written to the desktop containing all of the account's transactions.
Open CSV -- You may now open, view and print the CSV file using a spreadsheet, database or word processor.
Importing data into SplashMoney from Quicken
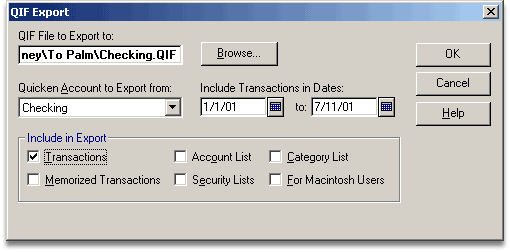
Quicken QIF Export Dialog
To transfer data (Accounts, Transactions, Categories and Classes) from Quicken into SplashMoney you must export QIF files from Quicken and import them into SplashMoney. You may wish to perform this process when first setting up SplashMoney to match your accounts in Quicken. To import transactions into SplashMoney from Quicken, do the following:
Import files to Palm from Desktop - Select the "Import files to Palm from Desktop" checkbox in the SplashMoney Conduit to import QIF files into SplashMoney. During each HotSync, the SplashMoney Conduit searches the SplashMoney "To Palm" folder for any QIF files and imports them into SplashMoney.
Export - In Quicken, select Export QIF File from the File Menu. Quicken provides the following Export options:
- QIF File to Export to: Click the Browse button, locate the
"To Palm" folder. The default location for storing QIF files
to import into SplashMoney is C:\My Documents\SplashMoney\To Palm;
however, you may change the location in the SplashMoney
Conduit, if desired. (Mac location: SplashMoney/To Palm folder.)
Enter a name for the QIF file and click OK. If you are exporting a single Account (see next) you should name the file the same as the Account name (e.g., Checking). If you are exporting All Accounts, you can name the file anything you'd like (e.g., All). - Quicken Account to Export from: Specify the Account(s) you wish to export. SplashMoney supports Checking, Savings, Credit Card, Cash, Asset and Liability accounts. You may select All Accounts, and SplashMoney will ignore the Account Types it does not support.
- Include Transactions in Dates: Specify a date range. You can export the entire date range to export all of your transactions, or you can specify a shorter period to just export recent transactions.
- Include in Export: Specify the type of data you wish to export. You may select Transactions, Account Lists, and/or Category Lists. It is recommended that you only select Transactions. QIF files containing Transactions also contain the necessary Account info and Categories used in those transactions, so you end up getting only the Account and Category information you need and nothing more.
Save - Click OK to save the QIF file in the "To Palm" folder. Whenever QIF files are placed in the "To Palm" folder, they are automatically imported into SplashMoney during the next HotSync.
HotSync - HotSync your device. After the QIF files have been successfully imported into SplashMoney, the SplashMoney Conduit will delete the QIF files from the "To Palm" folder, so that they won't get imported again during the next HotSync.
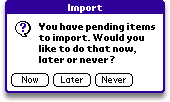
Launch SplashMoney - After the HotSync is complete, launch SplashMoney
and a dialog will appear asking if you would like to import the transactions.
Choose "Now" to do it now, "Later" to postpone until
the next time you launch SplashMoney, or "Never" to discard
the imported data. After selecting "Now," you must select
an Account to import the transactions into or choose <New Account>
to create a new account for the transactions.
All of the transactions in the QIF file will be added to SplashMoney
when you tap "Now" and you may end
up with duplicates if there are redundant transactions in the SplashMoney
Account. If the QIF file contains a complete history
of all transactions, you should delete your Accounts
in SplashMoney first, before tapping "Now."
 Import Dialog |
Note: It is not recommended that you keep a complete history of transactions in SplashMoney using the process outlined above. Instead, it is recommended that you just keep the ending balance in SplashMoney up-to-date so that you are aware of your current balance when creating new transactions. So, as an alternative to the process outlined above, you may simply update the ending balance in SplashMoney to match Quicken by tapping the ending balance amount that appears on the bottom of the Register View in SplashMoney, and entering the balance amount that appears in Quicken. |
Importing data into SplashMoney from Microsoft Money
To transfer data (Accounts, Transactions, Categories and Classes) from Microsoft Money into SplashMoney you must export QIF files from Microsoft Money and import them into SplashMoney. You may wish to perform this process when first setting up SplashMoney to match your accounts in Microsoft Money. To import transactions into SplashMoney from Microsoft Money, do the following:
Import files to Palm from Desktop - Select the "Import files to Palm from Desktop" checkbox in the SplashMoney Conduit to import QIF files into SplashMoney. During each HotSync, the SplashMoney Conduit searches the SplashMoney "To Palm" folder for any QIF files and imports them into SplashMoney.
Export - In Microsoft Money, select Export from the File Menu, and then choose Strict QIF.
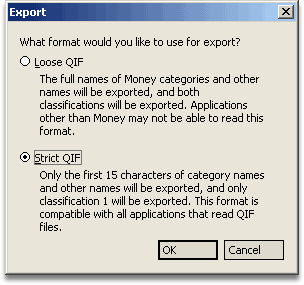
Microsoft Money QIF Export Dialog
Save - Locate the "To Palm" folder, enter a name for the QIF file and click OK. Name the file the same as the Account name (e.g., Checking).
The default location for storing QIF files to import into SplashMoney is C:\My Documents\SplashMoney\To Palm; however, you may change the location in the SplashMoney Conduit, if desired.
Regular - Select Regular in the Account Type dialog and click OK. SplashMoney only supports Regular Account types (i.e., Checking, Savings, Cash, Credit, Asset and Liability accounts).
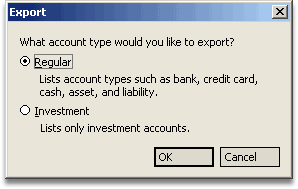
Export Account Type Dialog
Account - Select the Account you wish to export and click Continue. Repeat Steps 1-4 for each Account you wish to export.
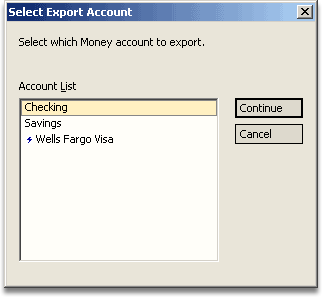
Select Export Account Dialog
HotSync - HotSync your device. Whenever QIF files are placed in the "To Palm" folder, they are automatically imported into SplashMoney during the next HotSync. After the QIF files have been successfully imported into SplashMoney, they are automatically deleted from this folder so they won't be imported again during the next HotSync.
Launch SplashMoney - After the HotSync is complete, launch SplashMoney
and a dialog will appear asking if you would like to import the transactions.
Choose "Now" to do it now, "Later" to postpone until
the next time you launch SplashMoney, or "Never" to discard
the imported data. After selecting "Now," you must select
an Account to import the transactions into or choose <New Account>
to create a new account for the transactions.
All of the transactions in the QIF file will be added to SplashMoney
when you tap "Now" and you may end up with duplicates if there
are redundant transactions in the SplashMoney Account. If the
QIF file contains a complete history of all transactions, you should
delete your Accounts in SplashMoney first,
before tapping "Now."
Import Dialog |
Note: It is not recommended that you keep a complete history of transactions in SplashMoney using the process outlined above. Instead, it is recommended that you just keep the ending balance in SplashMoney up-to-date so that you are aware of your current balance when creating new transactions. So, as an alternative to the process outlined above, you may simply update the ending balance in SplashMoney to match Quicken by tapping the ending balance amount that appears on the bottom of the Register View in SplashMoney, and entering the balance amount that appears in Quicken. |
Importing data into SplashMoney from an online bank
Data (Transactions) may be transferred from the desktop into SplashMoney by importing a QIF file. Most online banking institutions will allow you to export transactions in QIF format. To import data to SplashMoney from an online bank, do the following:
Download a QIF or OFX file - From your online bank, follow the steps necessary to download transactions in QIF or OFX format. Name the file the same as the account name in SplashMoney. For example, if the account you will be importing the data into in SplashMoney is called "Checking", name the QIF file "Checking.qif".
Place QIF or OFX files in the "To Palm" folder - The default location for storing files to import into SplashMoney is C:\My Documents\SplashMoney\To Palm. You may change the name and location of this folder in the SplashMoney Conduit, if desired. Whenever QIF files are placed in the "To Palm" folder, they are automatically imported into SplashMoney during the next HotSync.
HotSync - HotSync your device. After the files have been successfully imported into SplashMoney, the SplashMoney Conduit will delete the files from the "To Palm" folder, so that they won't get imported again during the next HotSync.
Launch SplashMoney - After the HotSync is complete, launch SplashMoney and a dialog will appear asking if you would like to import the transactions. Choose "Now" to do it now, "Later" to postpone until the next time you launch SplashMoney, or "Never" to discard the imported data. After selecting "Now," you must select an Account to import the transactions into or choose <New Account> to create a new account for the transactions.
Import Dialog |
All of the transactions in the file will be added to SplashMoney when you tap "Now" and you may end up with duplicates if there are redundant transactions in the SplashMoney Account. If the file contains a complete history of all transactions, you should delete your Accounts in SplashMoney first, before tapping "Now". |
Date and Number Formats
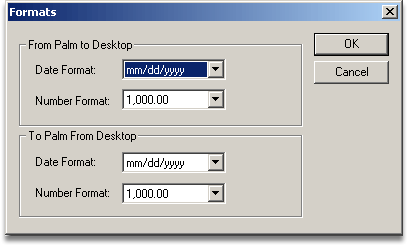
Format Dialog
Transactions are imported/exported to/from SplashMoney using the same date and number formats as your desktop settings. The import/export formats are completely independent from the date and number format settings you are using on your handheld. Typically, the date is exported in mm/dd/yyyy format, and the amounts are exported in 1,000.00 format. These formats are accepted by most versions of Quicken and Microsoft Money. If you are using an international or older version of Quicken or Microsoft Money, however, these formats may not be understood. In this case, you can change the formats by clicking the Format button in the SplashMoney Conduit dialog and making the following changes:
Date: Select the appropriate date format for your version of Quicken or Microsoft Money. If you are using an older version of Quicken or Microsoft Money, you may need to select a 2-digit year format, since the older versions may not understand the 4-digit year format.
Numbers: Select the appropriate number format for your version of Quicken or Microsoft Money (1,000.00 or 1.000,00).