/ SplashPhoto User Guide

SplashPhoto 5 for Palm OS User Guide


Table of Contents

Introduction
Installation
Registration
QuickStart
SplashPhoto Desktop
 • Installing Images
 • Edit Dialog
 • Browsing the Desktop Catalog
 • Desktop Preferences
 • Editing Multiple Images
Web Photo Albums (Desktop)
 • Picasa
 • Flickr
 • Facebook
 • Uploading Photos
 • Downloading Photos
SplashPhoto Conduit
Using SplashPhoto on the Handheld
 • Toolbar
 • Views
 • Camera
 • Location
 • Categories
Image View
 • Full Screen View
 • Image View Options Menu
 • Image Details
 • Pan & Zoom
Slide Show
 • Slide Show Preferences
Menus
 • Options
 • Preferences
 • Captions
 • Security
Web Photo Albums (Handheld)
 • Picasa
 • Flickr
 • Facebook
 • Uploading Photos
 • Downloading Photos

Treo


Introduction

SplashPhoto is a fast, easy-to-use image viewer for Palm OS® handhelds. SplashPhoto allows users to organize images on their handhelds for individual or Slide Show viewing. It is designed to provide optimal image viewing within the confines of a handheld's reduced display size and limited memory. In addition, SplashPhoto 5.0 includes desktop software that synchronizes with the handheld, for editing, optimizing, installing, organizing and cataloging images.


Installation

Run the Installer and follow the on screen instructions. You will be required to HotSync® your handheld to complete the installation. The installer installs the following files:

  • SplashPhoto.PRC--The Palm OS® viewer installed on your handheld.
  • Sample images--Sample images installed on your handheld.
  • SplashPhoto Desktop--A desktop application used to edit and synchronize images with your handheld.
  • SplashPhoto Conduit--A HotSync® Conduit used to synchronize images between the desktop and handheld.
  • SplashPhoto User Guide--This User Guide.

Registration

When you launch SplashPhoto you will be prompted to enter a registration code or to run in Trial mode. You may run the software for 30-days in full-functioning Trial mode. The Trial software and Registered software are identical. Once the trial period ends you must purchase and enter a registration code to continue using the software. You do not need to re-install the software. Simply enter a registration code and your Trial version will be converted into a Registered version and all images will remain intact.


QuickStart

  1. Launch the SplashPhoto Desktop application. Note: You must first launch SplashPhoto on the handheld and then synchronize before the desktop application will function.
  2. Drag images into the SplashPhoto application window to add them to your catalog. Or click the Add button in SplashPhoto to browse for images.
  3. The Edit dialog will automatically open for each image you have added. You may edit the Name, Category, Location, Zoom, Contrast, Brightness and cropping of each image. Click Next to page through the series of images you just added. Click Done when your changes are complete. The catalog displays the images you have added.
  4. Synchronize using the HotSync® Manager to synchronize the desktop catalog with your handheld.
  5. Launch SplashPhoto on the handheld and view the images!

SplashPhoto Desktop

The SplashPhoto desktop application allows you to add or remove images from your SplashPhoto catalog, categorize and add notes to images, crop and edit those images, and then synchronize the changes with your handheld.

New in SplashPhoto 5 - Upload and download images with Picasa, Flickr, and Facebook.

SplashPhoto Desktop


Installing Images

To add an image to your catalog, either click the Add button or drag an image file into the application window from somewhere on your computer. Supported image types include JPG, GIF, and BMP. SplashPhoto will convert all images to JPG format.

When you add an image to the catalog, the Edit Dialog opens so you can adjust the Image Details of each image added.

Once you have finished editing the Image Details, click Done and the images in your catalog will be synchronized to the handheld on the next synchronization.


Edit Dialog

Edit Dialog
  • Name: change the name of the image.
  • Location: Choose to either install the image to Internal memory or an External
    Memory Card. When installing to a card, the images will be stored in the DCIM/SplashPhoto directory.
  • Category: Sets the category the image will belong to.
  • Notes: Add any additional information.
  • Crop: Check this box to automatically crop the image and resize it to fit your device’s screen. Leave this unchecked to install the full image.
  • Zoom/Crop: Use the slider to adjust the size and cropping of the image. Then click and drag on the image preview to adjust the crop.
  • Contrast: Use the slider to adjust how sharp the image is.
  • Brightness: Use the slider to adjust how bright the image is.
  • Rotate: Click the buttons to rotate 90 degrees in either direction.
  • Private: Check this box to set the image as private. It will be hidden in SplashPhoto if Privacy settings are turned on.
  • Landscape Orientation: On Hi-Res+ devices (rectangular screens), you will have the option of changing the orientation from Portrait to Landscape. This option will be hidden on devices with square displays.
  • Previous/Next: If you have selected multiple images, these buttons will move forward or back through the series of images.
  • Done: Click Done if you have made all of the edits you wish to make for the entire series.
  • Cancel: This clears any edits you have made to the current image and returns to the image catalog.

Browsing the Desktop Catalog

When you open SplashPhoto Desktop, your user name will appear at the top of the window. To change users, click the User menu and select the user.

You can view your images on the desktop a number of different ways. At the top left of the SplashPhoto Desktop window, there are 4 view buttons available:

  • List View: Displays all of the details of the images in a list. The columns displayed can be changed by choosing Show Columns from the Edit menu.
  • Detail View: Displays Thumbnail, Name, Category, Location, Dimensions, Size, and Notes. Note: The Detail View is particularly useful for changing an image's location or category.
  • Thumbnail View: Displays large thumbnails and the image Name.
  • Gallery View: Displays small thumbnails only.

These view options are also available from the View Menu.

In the top middle of the application window, there is a pull-down menu from which you can filter by the Location of the images.

  • All: Displays all images in all locations.
  • Internal: Displays images installed to the handheld’s internal memory.
  • <Memory Card Name>: Displays images installed on a handheld external memory card.
    Note: SplashPhoto will catalog images stored in the following locations on the memory card:
    • DCIM/SplashPhoto -- this is where SplashPhoto stores its images on a memory card.
    • DCIM -- this is where digital cameras typically store images on a memory card. This is also where a Palm device will install images if you install them using the Palm Install tool.
    • PALM/Images -- the Sony Clie will install images to this directory if you install them using the Palm Install tool.

The top right pull-down allows you to filter by the Category of the images. You can also select Edit Categories from the pull-down list and add, delete, or change the categories you can select from.


Desktop Preferences

The Preferences for the SplashPhoto Desktop allow you to set a default action for adding images to the catalog. Access the Preferences from the Edit menu.

PreferencesYou can set the default Location that you wish to be applied to newly added images.

Set the Category for new images added to the catalog.

Note: The default location and category are applied to new images when viewing All images. If you are filtering the catalog by a specific category or location when you add images to the catalog, that category and/or location will be applied to the new images.

Set the Orientation for new images. Auto orientation will automatically select the appropriate orientation to match the aspect ratio of the image.

The check box for Resize to fit screen is the same option as in the Edit Dialog. It automatically crops the picture to best fit the handheld screen. Unchecking this will install the full size image.

The check box for Automatically open Edit Images dialog allows you to bypass the Edit Dialog. This is especially useful if you have set a default action for all images and want to have these settings automatically applied to each image without having to preview each image.

Finally, there is a slider to adjust the quality/compression of the JPGs that will be installed on your device. Higher quality means larger image files, requiring more memory on the device which may take longer to display.

Editing Multiple Images

You can select multiple images by shift-clicking or control-clicking them in the catalog, and select Assign Category from the File menu to apply the same category to all of the images. Likewise, you can move the selected images to the same location (Internal or Card) by selecting Change Location from the File menu. And you can delete a group of images by clicking the Delete button.

Web Photo Albums (Desktop)

Authorize Albums

Authorize Albums: In order to upload and download photos with your Picasa, Flickr or Facebook account, you need to authorize the albums.

  • Select Album->Authorize Albums.
  • You will see the current authorization status of each of the albums.

Once you Authorize your Picasa, Flickr, and/or Facebook accounts, a SplashPhoto5 album is created in your Web Album.

You will be able to upload and download photos to and from the Web Albums on both your desktop and your device (data connection required).

Picasa

Picasa Authorization

Authorize Albums

Step 1: Select Album->Authorize Albums. Click on the ‘Not Authorized’ button alongside Picasa.

Step 2: Enter your Picasa Google account details in the dialog and select Authorize.

If you have entered the correct login details, your Picasa album status will show "Authorized."

Congratulations! You have authorized SplashPhoto to use Picasa to upload and download photos.

Note: If you see an Authorization failure, please go to http://picasa.google.com/pwa.html and check if the login details are correct.


Flickr

Flickr Authorization

Step 1: Select Album->Authorize Albums. Click on the "Not Authorized" button alongside Flickr.

Step 2: Flickr authorization needs to be done on the internet browser. Press OK to continue and wait for the browser to open up the login page.

Flickr

Step 3: Log into Flickr, click on ‘OK, I’LL ALLOW IT’ to let SplashPhoto authorize your Flickr account.

Flickr

Step 4: Close the browser and return to SplashPhoto. Press Ok.

Flickr

If you have entered the correct login details, your Flickr album status will show "Authorized."

Congratulations! You have authorized SplashPhoto to use Flickr to upload and download photos.

Facebook

Facebook Authorization

Step 1: Select Album->Authorize Albums. Click on the ‘Not Authorized’ button alongside Facebook.

Step 2: Facebook authorization needs to be done on the internet browser. Press OK to continue and wait for the browser to open up the login page.

Facebook

Step 3: During login, select ‘Save my login info to avoid logging in to Facebook again to use this application’ and login.

Facebook

Step 4: Select ‘Allow SplashPhoto to access my information’ and hit ‘Log into SplashPhoto’.

Facebook

Step 5: Close the browser and return to SplashPhoto. Press Ok.

Facebook

Uploading Photos to Facebook

You need to ‘Allow SplashPhoto’ to upload photos without your arrival each time (This is a one time process)
Click OK to open the browser and login to Facebook.

Facebook

Select ‘Allow SplashPhoto to upload or modify photos without my approval each time’ and Hit ‘Authorize SplashPhoto’.

Facebook

Selected photo will be uploaded to the SplashPhoto5 album in Facebook.

Upload Photos to Web Albums

Once you Authorize your Picasa, Flickr, and/or Facebook accounts, a SplashPhoto5 album is created in your Web Album.

To upload any photo from SplashPhoto Desktop, right click on it, and select Upload To -> Picasa/Flickr/Facebook.

Selected photo will be uploaded to the SplashPhoto5 album in the Web Album.

Upload

Download Photos from Web Albums

Select from the Album Menu -> View albums ->Picasa/Flickr/Facebook.

You can select any album, name of the photo, see details, view thumbnail, and hit Download button to download the photo.

Download Web Photos

Synchronizing Authorization

First, photos are synchronized with the handheld device (as per the Sync settings).

Then, you can choose to synchronize each album’s authorization details with the handheld device by selecting OK at the end of file synchronization. This way, you do not need to perform authorization while uploading and downloading photos on the device with the web albums.

SplashPhoto Conduit

The SplashPhoto Conduit is responsible for synchronizing changes between the handheld and the desktop. By default, it will synchronize the catalogs automatically. Occasionally, however, you may need to change the settings in order to restore a picture from your handheld that you have accidentally removed from your desktop, or vice-versa.

HotSync System Tray

To open the SplashPhoto Conduit, do the following:

  1. Click the HotSync® Manager icon in the Windows system tray and select Settings (or Custom) to open the Settings dialog.
  2. If you are using Palm Desktop 6.2 or later, you need to click "Applications" next.
  3. Double click the SplashPhoto entry in the Conduit list. The SplashPhoto Conduit Dialog appears.


SplashPhoto Conduit

There are 4 possible settings:

  • Synchronize the files: This is the default setting for SplashPhoto and synchronizes the catalog on the handheld with that on the desktop. Changes to the desktop catalog will be changed on the handheld, and vice-versa.
  • Desktop overwrites handheld: The handheld catalog will be overwritten by the desktop catalog. This is useful if you have accidentally deleted a picture from the handheld, but it still resides on the desktop.
  • Handheld overwrites desktop: The desktop catalog will be overwritten by the handheld catalog. This is useful if you have accidentally deleted a picture from the desktop, but it still resides on the handheld.
  • Do nothing: No synchronization will take place in SplashPhoto.

Set as default: Check this box if you want to keep the synchronization setting to which you are changing. Leave this unchecked if you want the settings to revert to Synchronize the files after one HotSync® operation (recommended).


Using SplashPhoto on the Handheld

On the handheld, launch SplashPhoto from the Applications Launcher by tapping its icon.

Toolbar

At the bottom left of the SplashPhoto window, there is a toolbar.

toolbar

  • Use the wrench button to access Preferences.
  • Use the Camera button to open the Camera to capture an image. On devices lacking a camera, the Slide Show button will be at the center.
  • Use the Slide Show button to Start a Slideshow. On devices lacking a camera, the Slide Show Preferences button will be at far right.
  • Use the Left and Right arrow buttons to cycle through Views.

Views

You can view your images on the handheld using SplashPhoto's five different views:

List View
List View
  • List View: Displays the Name, Category, and Size of image in a list. The columns displayed can be changed in Preferences.
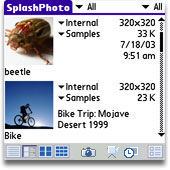
  • Detail View: Displays Thumbnail, Name, Category, Location, Dimensions, Size, and Notes. Note: The Detail View is particularly useful for changing an image's location or category.
  • Thumbnail View: Displays large thumbnails and the image Name.
  • Gallery View: Displays small thumbnails only.
  • Tree View: New in SplashPhoto 5, displays a hierarchical view of images by Location and Category.
Detail View
Detail View
Thumbnail View
Thumbnail View
Gallery View
Gallery View
Tree View
Tree View

Camera

Tap the camera icon to capture a photo within SplashPhoto. The camera function is only supported on the following devices that have a built-in cameras:

  • Treo and Centro devices
  • Zire 72
  • Sony Clie NX70, NX73, NX80, NZ90, UX-40, UX-50, TJ-27, TJ-37, TH-55. Clie users must install a separate PRC for the camera to function, which you can download here.

Set the default image quality and resolution in the Camera Preferences dialog, which you can access from the Prefs menu in any of the browser views.

Location

In the top middle of the application window, there is a pull-down menu from which you can filter by the Location of the images.

  • All: Displays images in all locations.
  • Internal: Displays images installed to the handheld’s internal memory.
  • <Memory Card Name>: Displays images installed on an external memory card. Note: SplashPhoto will catalog images stored in the following locations on the memory card:
    • DCIM/SplashPhoto -- this is where SplashPhoto stores its images on a memory card.
    • DCIM -- this is where digital cameras typically store images on a memory card. This is also where a Palm device will install images if you install them using the Palm Install tool.
    • PALM/Images -- the Sony Clie will install images to this directory if you install them using the Palm Install tool.

Categories

The top right pull-down in any of the catalog view windows allows you to filter by the Category of the images.

You can also select Edit Categories from the pull-down list and add, delete, or change the categories you can select from.


Image View

Full Screen View

Full Screen

To view a full screen image, press the center nav button or simply tap on an image from List, Tree, Thumbnail, Gallery, or Detail views. Page through the images by using the nav pad.

Press the center nav button or tap the screen again to exit back to one of the catalog views.

To access the Image View Options Menu, press the menu button or tap near the top of the screen.

Image View Options Menu

Image View Options

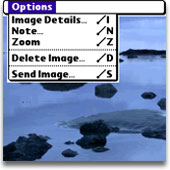
There is a different menu available from Image View mode which looks like this:

  • Image Details -- Displays the Image Details dialog.
  • Note -- Opens the Note dialog where you can add or edit the note field for the image.
  • Zoom -- Displays the full image and brings up the Pan and Zoom controls.
  • Delete Image -- Deletes the image from the catalog.
  • Send Image -- Sends the image via IR Beaming, Bluetooth, SMS, or email, if available.
  • Send to Picasa/Flickr/Facebook -- Uploads the image to the selected service assuming it is Authorized.

Image Details

Image Details

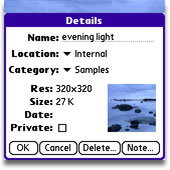
In the Image Details dialog you can review and modify the image attributes.

  • Name -- Use this field to rename the image.
  • Category -- You can assign each image to one of the user-definable categories.
  • Location -- You can change the location of the image.
  • Resolution -- Displays the resolution of the image.
  • Size -- Displays the file size of the image.
  • Date -- Displays the date the image was created.
  • Private: Check this box to mark the image private. It will be hidden if Security settings are correctly set.
  • Delete -- Deletes the image.
  • Note -- Click the Note button to add additional information about the image in the Notes field.

Pan & Zoom

Zoom

Enter zoom mode by either selecting Zoom from the Options Menu or using the Zoom In hardware button.

Entering Zoom mode displays the image at 100% of its size. If there is not enough memory available to decode the image and display it at 100%, it will be displayed as large as memory will allow.

There are roughly 2-8 zoom levels, depending on the size of the image and size of your display. You can Zoom by tapping the + and - buttons on the screen and Pan the image by dragging the stylus on the image.

You can use the hardware buttons for zooming in/out and panning. The buttons differ depending on whether or not your Palm has a 5-Way-Nav-Pad as follows:

Non-5-Way-Nav-Pad:

zoom out

pan left

pan up

pan right

zoom in

pan down

5-Way-Nav-Pad:

zoom out

zoom in

pan up

unused

unused

pan
left


pan
right

pan down

Tap the screen to exit the Zoom mode and return to the browser view.

Slide Show

Slid Show


Tap the Slide Show icon to start a Slide Show. All of the images currently in view will be displayed in the Slide Show and the Slide Show will start from the currently selected images or the beginning if no image is selected. Images will be displayed according to your Slide Show Preferences.

Stop the Slide Show by tapping the screen.

The Image View Options Menu is also available during Slide Show mode.

Slide Show Preferences

Access the Slide Show Preferences on the handheld by tapping the Slide Show Prefs button on the toolbar.


  • Duration: Tap the pull-down menu to select the length of time you would like each image to display during a Slide Show. You can set the duration to Manual as well, and use the up/down hardware buttons to page through the images as you please.
  • Effect: Select from the following Slide Show transition effects: Cut, Dissolve, Wipe, Push, or Random.
  • Auto-run while charging: Check this box to have SplashPhoto automatically start up and run when you place the handheld in its cradle.
  • Show slides in random order: Check this box to display images randomly rather than sequentially during a Slide Show.
  • Show progress bar: Check this box to display a small progress bar at the top of the screen whenever an image is being loaded and doesn’t load immediately (this may occur on older handheld devices).
  • Play Music: You may check this box if you have the ability to play music files on your handheld.

To play background audio while viewing a Slide Show you must have one of the following: Pocket Tunes 3.0 or later installed, AeroPlayer 5.0 or later installed, or a Zire 72. If your system meets one or more of these requirements, you can choose to play audio in the background while viewing a Slide Show.

SplashPhoto scans for music in the following folders on external memory cards:

  • /Audio
  • /MSAudio

Tap the Music button to display the Music Picker dialog. There you can set the volume and select which songs to play.

Menus

Options

Options

To display the Options Menu, return to the browser and tap the toolbar at the top of the SplashPhoto window.

  • Run Slide Show : Starts a Slide Show according to your Slide Show Preferences.
  • Categorize All -- Allows you to change the category of all images that are currently in view. For example, this could be very useful to assign all the unfiled images to a category.
  • Move All -- Allows you to move all images currently in view to and from external memory cards. For example, you could move all images on internal memory to an external memory card.
  • Delete All -- Deletes all images currently in view.
  • Refresh -- SplashPhoto maintains a Cache File, which speeds performance when viewing images. Sometimes the cache file can become out of sync, causing errors to occur in SplashPhoto. If you are experiencing problems with viewing images, select this menu command to refresh the cache file.
  • Security -- Opens the Security dialog where you can hide or show images marked Private.

Preferences

Preferences

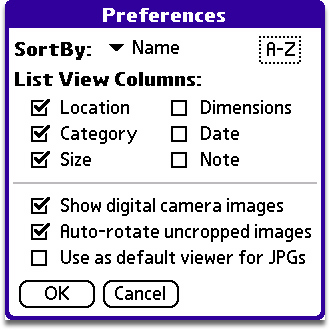
You can access Preferences on the handheld by tapping the Preferences button on the toolbar.

  • Sort By: Tap the pull-down menu to select a different image detail to sort by. Tap the A-Z to reverse the sort order.
  • List View Columns: Check the boxes of the image details you would like to have displayed in List View.
  • Auto-rotate uncropped images: On devices with rectangular screens, rectangular images will be automatically rotated to fit the screen if this box is checked.
  • Use as default viewer for JPGs/BMPs/GIFs: Check this box to choose SplashPhoto as the application that opens whenever a JPG/BMP/GIF file is opened on your handheld (e.g., when opening a JPG attachment in an email message).

Captions

Caption Prefs

Access the Caption Preferences dialog by tapping the menu button or the top left of the screen and selecting Caption Preferences from the Prefs menu.

Here you can turn on/off captions which will display details when in full screen display.

Select the details you would like to display and select the color in which to display them.

Security

Security

You can mark an image as Private to hide that image from view. Mark an image private either in the SplashPhoto Desktop or in the Image Details on the handheld.

To hide images marked Private:

  1. Open SplashPhoto and choose Security from the Options menu in any of the catalog views.
  2. Change the Current Privacy to Hide Records and tap OK.

Note: All images marked Private will remain hidden until you change the Security setting back to Show Records.

Web Photo Albums (Handheld)

Web Photo Albums

SplashPhoto 5 has the ability to upload and download images to/from Picasa, Flickr, and Facebook.

It is easier to authorize these services via the SplashPhoto Desktop, but it can be done on the handheld as well, with the exception of Facebook. Facebook can only be authorized via the SplashPhoto Desktop, but then you can synchronize the authorization with the handheld application and use the upload and download services in SplashPhoto on the handheld.

When you select Authorize Albums from the Albums menu, SplashPhoto will display the authorization status of each of the services. To authorize a service, tap the Not Authorized button next to it.

Picasa Authorization

Web Photo Albums

To authorize SplashPhoto with your Picasa account, tap the Not Authorized button for Picasa in the Authorize Albums screen.

The dialog to the left will be displayed, where you need to enter your User ID and Password for Picasa.

Then tap Authorize and SplashPhoto will communicate with the Picasa server to confirm the authorization.

Flickr Authorization

Flickr Authorization

To authorize SplashPhoto with your Flickr account, tap the Not Authorized button for Flickr in the Authorize Albums screen.

You will be warned that your web browser will be opened. Tap OK to continue.

Flickr Authorization

The Flickr login screen will be loaded.

Enter your Yahoo! ID and Password, and check the box for Keep me signed in.

Then tap the Login button.


Flickr Authorization

After Flickr confirms that you have successfully authorized SplashPhoto 5 to be used with their service, you can exit the browser and return to SplashPhoto.

Flickr Authorization

When you have returned to SplashPhoto, tap the OK button to confirm the success of the authorization, and SplashPhoto will show the status as Authorized.

Facebook Authorization

Facebook can only be authorized on the SplashPhoto Desktop at this time, after which you can synchronize that authorization with the handheld by performing a HotSync operation.

Uploading Photos

Upload Photos

To upload an image to a web album, first you must authorize that web album. To upload an image:

  1. Tap an image to view it full screen.
  2. Press the menu button or tap the top of the screen to open the Image View Options Menu, and select Send to Picasa/Flickr/Facebook.
  3. SplashPhoto will connect to the selected service and you will get a confirmation if the upload was successful. At this point the photo is available online in the SplashPhoto album/set.

Downloading Photos

To begin downloading photos from a Web Photo Album, first you must authorize that web album. Then select View Picasa/Flickr/Facebook from the Albums menu, and follow these steps:

Download Photos

1. The first screen you will see is a list of albums/sets available in the selected online photo service.

Select an album/set and tap View.

Download Photos

2. The next screen you will see is a list of the photos available in the selected album/set.

Select and image and tap Details to see the type, size, resolution, and any associated notes.

Tap Download to begin downloading the image.


Download Photos

3. You will be able to assign a new name to the image if you wish, as well as choose a Location to which the the image will be saved.

Download Photos

4. SplashPhoto will let you know when it has completed downloading.

Tap OK, and then you can close out of the the download system to view your photo, or continue downloading other photos.