Photos User Guide
![]()
SplashData, Inc.
270 Eakin Dr.
Bainbridge Island, WA 98110
www.splashdata.com
Table of Contents
Introduction
Installation
Support
QuickStart
Photos Desktop
� Installing
Images
� Edit Dialog
� Browsing
the Desktop Catalog
� Desktop
Preferences
� Editing
Multiple Images
� Photos
Conduit
Browsing the Handheld Catalog
� Views
� Categories
Image View
� Full Screen
View
� Image View Options
Menu
� Image Details
� Pan & Zoom
Slide Show
� Slide Show Preferences
Menus
� Options
� Preferences
� Captions
� Security
|
Photos is a fast, easy-to-use image viewer for Palm OS® handhelds. Photos allows users to organize images on their handhelds for individual or Slide Show viewing. It is designed to provide optimal image viewing within the confines of a handheld's reduced display size and limited memory. In addition, Photos 4.0 includes desktop software that synchronizes with the handheld, for editing, optimizing, installing, organizing and cataloging images. |
|
Photos is already loaded on your handheld. To install the Photos desktop application, insert the software installation CD in your computer's CD drive, and then follow the onscreen instructions for installing applications. |
|
If you have questions about the use of Photos, there are a number of resources available:
|
|
|
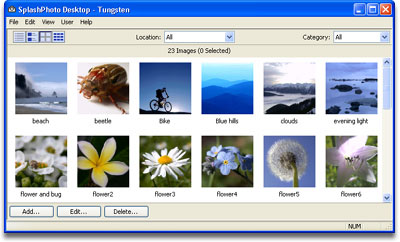
The Photos desktop application allows you to add or remove images from your Photos catalog, categorize and add notes to images, crop and edit those images, and then synchronize the changes with your handheld. Launch the Photos Desktop to access your image catalog.
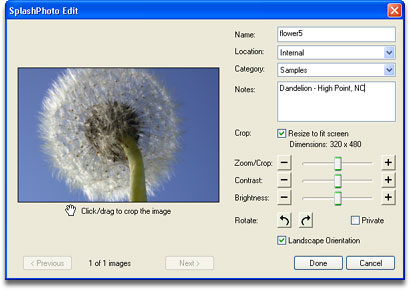
To add an image to your catalog, either click the Add button or drag an image file into the application window from somewhere on your computer. Supported image types include JPG, GIF, and BMP. Photos will convert all images to JPG format. When you add an image to the catalog, the Edit Dialog opens so you can adjust the Image Details of each image added. Once you have finished editing the Image Details, click Done and the images in your catalog will be synchronized to the handheld on the next synchronization. |
|
|
|
When you open Photos Desktop, your user name will appear at the top of the window. To change users, click the User menu and select the user. You can view your images on the desktop a number of different ways. At the top left of the Photos Desktop window, there are 4 view buttons available:
These view options are also available from the View Menu The top right pull-down allows you to filter by the Category of the images. You can also select Edit Categories from the pull-down list and add, delete, or change the categories you can select from. |
|
The Preferences for the Photos Desktop allow you to set a default action for adding images to the catalog. Access the Preferences from the Edit menu (Photos Desktop menu on Mac OS).
Note: The default category is applied to new images when viewing All images. If you are filtering the catalog by a specific category when you add images to the catalog, that category will be applied to the new images. The check box for Resize to fit screen is the same option as in the Edit Dialog. It automatically crops the picture to best fit the handheld screen. Unchecking this will install the full size image. The check box for Automatically open Edit Images dialog allows you to bypass the Edit Dialog. This is especially useful if you have set a default action for all images and want to have these settings automatically applied to each image without having to preview each image. Finally, there is a slider to adjust the quality/compression of the JPGs that will be installed on your device. Higher quality means larger image files, requiring more memory on the device which may take longer to display. You can select multiple images by shift-clicking or control-clicking them in the catalog, and select Assign Category from the File menu to apply the same category to all of the images. And you can delete a group of images by clicking the Delete button. |
 Set
the Category for new images added to the catalog.
Set
the Category for new images added to the catalog.
|
To open the Photos Conduit, do the following: 1. Click the HotSync® Manager icon in the Windows system tray and select Custom to open the Custom dialog. (On Mac OS: Launch HotSync® Manager or Palm Desktop™ and select Conduit Settings from the HotSync menu.) 2. Double click the Photos entry in the Conduit list. The Photos Conduit Dialog appears. There are 4 possible settings:
Desktop overwrites handheld: The handheld catalog will be overwritten by the desktop catalog. This is useful if you have accidentally deleted a picture from the handheld, but it still resides on the desktop. Handheld overwrites desktop: The desktop catalog will be overwritten by the handheld catalog. This is useful if you have accidentally deleted a picture from the desktop, but it still resides on the handheld. Do nothing: No synchronization will take place in Photos. Set as default: Check this box if you want to keep the synchronization setting to which you are changing. Leave this unchecked if you want the settings to revert to Synchronize the files after one HotSync® operation (recommended). |
 The
Photos Conduit is responsible for synchronizing changes between
the handheld and the desktop. By default, it will synchronize the
catalogs automatically. Occasionally, however, you may need to change
the settings in order to restore a picture from your handheld that
you have accidentally removed from your desktop, or vice-versa.
The
Photos Conduit is responsible for synchronizing changes between
the handheld and the desktop. By default, it will synchronize the
catalogs automatically. Occasionally, however, you may need to change
the settings in order to restore a picture from your handheld that
you have accidentally removed from your desktop, or vice-versa. Synchronize
the files: This is the default setting for Photos
and synchronizes the catalog on the handheld with that on the desktop.
Changes to the desktop catalog will be changed on the handheld,
and vice-versa.
Synchronize
the files: This is the default setting for Photos
and synchronizes the catalog on the handheld with that on the desktop.
Changes to the desktop catalog will be changed on the handheld,
and vice-versa.|
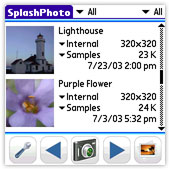
On the handheld, launch Photos from the Applications Launcher by tapping its icon. You can view your images on the handheld a number of different ways. At the bottom left of the Photos window, there are 4 view buttons available:
|
||||||


|
You can also select Edit Categories from the pull-down list and add, delete, or change the categories you can select from.
|
 The
top right pull-down in any of the catalog view windows allows you
to filter by the Category of the images.
The
top right pull-down in any of the catalog view windows allows you
to filter by the Category of the images. |
Tap the screen again to exit back to one of the catalog views. To access the Image View Options Menu (see below), tap the top left of the screen or the menu button. Flip back and forth through the series of images using the navigation pad.
|
 To
view a full screen image, simply tap on an image from List,
Thumbnail, Gallery, or Detail
views. Page through the images by using the up and down buttons.
To
view a full screen image, simply tap on an image from List,
Thumbnail, Gallery, or Detail
views. Page through the images by using the up and down buttons.
|
There is a different menu available from Image View mode which looks like this: |
 Image
Details: Displays the
Image
Details: Displays the
|
In the Image Details dialog you can review and modify the image attributes. |
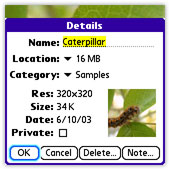 Name
-- Use this field to rename the image.
Name
-- Use this field to rename the image. |
Entering Zoom mode displays the image at 100% of its size. If there is not enough memory available to decode the image and display it at 100%, it will be displayed as large as memory will allow. There are roughly 2-8 zoom levels, depending on the size of the image. You can Zoom by tapping the + and - buttons on the screen and Pan the image by dragging the stylus on the image. You can use the hardware buttons for zooming in/out and panning as follows:
Tap the screen to exit the Zoom mode and return to the browser view. |
|||||||||||
 Enter
zoom mode by either selecting Zoom from the Options Menu or using
the Zoom In hardware button.
Enter
zoom mode by either selecting Zoom from the Options Menu or using
the Zoom In hardware button.|
Stop the Slide Show by tapping the screen. The Image View Options Menu is also available during Slide Show mode. |
|
Access the Slide Show Preferences on the handheld by tapping the
Slide Show Prefs button
|
|
To display the Options Menu, return to the browser and tap the toolbar at the top of the Photos window. |
 Run
Slide Show : Starts a
Run
Slide Show : Starts a |
You can access Preferences on the handheld by tapping the Preferences button on the toolbar.
|
 Sort
By: Tap the pull-down menu to select a different image
detail to sort by. Tap the A-Z to reverse the sort
order.
Sort
By: Tap the pull-down menu to select a different image
detail to sort by. Tap the A-Z to reverse the sort
order.|
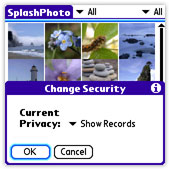
Here you can turn on/off captions which will display details when in full screen display. Select the details you would like to display and select the color
in which to display them. |
 Access
the Caption Preferences dialog by tapping the menu button or the
top left of the screen and selecting Caption Preferences from the
Prefs menu.
Access
the Caption Preferences dialog by tapping the menu button or the
top left of the screen and selecting Caption Preferences from the
Prefs menu.
|