 |
SplashShopper
for Smartphone User Guide
|
SplashShopper is a shopping list application for Windows
Mobile Smartphones that is perfect for keeping lists of groceries to
buy, movies to rent, CDs to buy, books to read and more! You can create
an unlimited number of lists, and each list can be customized to record
and display only the information that is relevant. And data can be
easily synchronized between SplashShopper on your Smartphone
and SplashShopper on the desktop (Windows only).
SplashShopper on the Smartphone and SplashShopper Desktop
are virtually identical. This user guide focuses on the features in
SplashShopper on the Smartphone. You may prefer to do most of your data
entry in SplashShopper Desktop, however, since it's faster and easier
with a keyboard, and then synchronize
the data with your Smartphone.
Launch the SplashShopper Installer and follow the on
screen instructions. You will be required to connect your Smartphone
to complete the installation. The installer installs the following
files:
- SplashShopperSP.CAB - A Windows Mobile Smartphone application
used to view and edit information on the Smartphone.
- SplashShopper Desktop -- A desktop application (for
Windows) used to view and edit information on the desktop.
- RapiTransport.dll -- A Sync provider used to
synchronize data between the device and the desktop.
- Sample Shopping Lists - Sample shopping lists to help you
get started with SplashShopper.
- SplashShopper User Guide - This User Guide.
- SplashShopper Read Me.txt -- License agreement, system requirements,
and copyright info.
Launch SplashShopper
After the application is installed on the Smartphone,
press the Start key and select the SplashShopper application icon to
run.
When you launch SplashShopper on the Smartphone you will
be prompted to enter a registration code or to run in Trial mode. You
may run the software for 30-days in full-functioning Trial mode. The
Trial software and Registered software are identical. Once the trial
period ends you must purchase and enter a registration code to continue
using the software. You do not need to re-install the software. Simply
enter a registration code and your Trial version will be converted into
a Registered version and all data will remain intact.
Following is a quick overview of how SplashShopper can
be used as a tool for grocery shopping:
- Launch SplashShopper. You're presented with
a number of sample shopping lists.
- Open the Grocery list by selecting it with the nav pad and
pressing the center nav button. The All View is displayed, which
shows a list of commonly purchased grocery items.
- Mark the items you need by pressing the center nav button.
A cart icon (
 )will
appear next to the items, indicating that they are needed. )will
appear next to the items, indicating that they are needed.
- Once you're done marking the items you need, press the left
soft key to switch to the "Need" tab. This will display
a list of only the items marked as needed.
- Now go shopping and mark items completed by
pressing the center nav button. As you check things
off they will be removed from the Need list. Once all the items
are gone, you're done!
That concludes the Quick Start. Read on to learn
more about the individual features of SplashShopper.
| 
Home View 
List Info Dialog
|
|
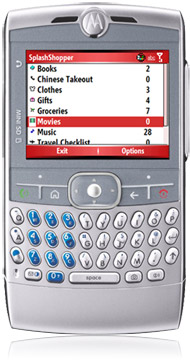
Home
When you first launch SplashShopper you are presented with the
Home View. The Home View displays several sample Shopping
Lists. The number of needed items for each list are displayed
on the right. Select a list and press the center nav button
to open it.
Editing Lists
You may create new lists or edit existing ones, as follows:
- Select Options > Edit to open the Edit Lists Dialog.
- Select a List and press Options > Edit, or Options > New.
- The List Info Dialog appears (see next).
List Info
You can create an unlimited number of lists. Each list includes:
- Name - The name of the shopping list (e.g., Groceries,
Books, Music, etc.).
- Store Menu - The name of the Store Menu (e.g., Store,
Author, Artist, etc.). See Stores for
more details.
- Custom 1 - The name of custom field 1 (e.g., Description,
Author, Artist, etc.).
- Custom 2 - The name of custom field 2 (e.g., Aisle,
Publisher, Record Label, etc.).
- Tax Rate - Enter a tax rate (optional), if you wish
to calculate tax into the Total cost
(Qty x Price x Tax Rate) for all items marked as taxable
in Item Details.
- Icon - Press Options > Change Icon to select
a custom icon for the List.
- Track Per-Store Prices - Select this option if you
wish to track separate prices for each store in the Multiple
Stores dialog (see Stores for more
details).
|
All View
Need View
|
|
Select a list in the Home View and press
the center nav button to open the List View. The List View
displays items in a list format separated into two tabs - All
and Need. The following options are available in the List View:
- Stores - Use the Store menu
on the top left to filter the view by Store.
- Categories - Use the Category menu on the top right
to filter the view by Category.
- All View - The All View displays all the items in
the list. Items that are needed are marked with an icon (
 ).
Select an item and press the center nav button to mark an
item as needed. ).
Select an item and press the center nav button to mark an
item as needed.
- Need View - The Need View displays only the items
that are marked as Needed in the All View. The far left column
displays a checkbox allowing you to check off items as they
are purchased.
- Total - Displays the Total price
of all the items currently in view. Note: You can choose
to show or hide the Total in Preferences.
- Back - Select Back from the Menu
to return to the Home View.
- QuickList - Use the QuickList menu to quickly mark
a predefined list of items as needed (see QuickLists for
more info).
|
Menu Options
|
|
When you press the Menu key, the following
menu options will appear:
- Item >
- New - Adds a new item to the list.
- View/Edit - Opens the selected Item
Details.
- Delete - Delete the selected item
from the list.
- Options >
- List Info - Displays the List
Info dialog.
- Mark All as Needed - Marks all the items in
the All View as Needed.
- Mark All as Unneeded - Marks all the items in
the All View as Unneeded.
- Delete Unneeded - Deletes all the items in the
All View marked as Unneeded.
- About - Displays version info for
SplashShopper.
|
- Prefs >
- Font Size - Select a font size between
7pt and 12pt.
- Preferences - Opens the Preferences dialog.
- Show Columns - Customize List View in
SplashShopper by selecting which columns are displayed.
- QuickList - Opens the QuickList menu - More
Info.
- Sort - You can sort by any of the displayed
columns, including Needed/Unneeded. Select Ascending/Descending
to change the sort direction.
- Total - The Total Menu on the bottom of the All and Need
Views show the total of all the items currently in view.
The Total is calculated as Quantity x Price x Tax Rate. The
Total Menu changes context depending on whether you are in
the All View or Need View, so that you can see the total
of all items Needed, just the Uncompleted ones, and so on.
Note: In order to calculate Total Completed, you must be
Showing Completed Items in Need View, as specified in Preferences.
- Beam - Use your IR port to beam the entire list or just
the Needed items to another SplashShopper user. SplashShopper
must be open on the receiving device as well, and it must
be a Windows Mobile version. The recipient can choose to
accept the items as a new list, or import them into the open
list.
- Back - Return to the Home
View.
|

Quicklist Menu
Edit QuickLists
|
|
QuickLists allow you to quickly mark a set
of predefined items as needed. When you select a QuickList
it will add the set of predefined items to your Need list.
You can create an unlimited number of QuickLists for everything
from "Weekly Groceries" to "Chicken Cacciatore
ingredients" to "Bathroom supplies".
To use a QuickList, just select the QuickList
name from the QuickList menu and the predefined set of items
will be marked as needed and added to the Need View. Note:
the QuickList items will be appended to the Need View along
with any other items that are in the Need View. In this way,
you can select multiple QuickLists, like "Weekly Groceries" and "Bathroom
Supplies" to add the items from both QuickLists to the
Need View.
Creating QuickLists
To create a new QuickList:
- In the All View, mark a number of Items as needed.
- From the Menu, select QuickList > New
List.
- Enter a name for the QuickList and press OK.
Editing QuickLists
To delete or change the name of a QuickList:
- From the Menu, select QuickList > Edit QuickList.
- Select a QuickList name and press Options > Edit to rename
it, or Options > Delete to delete it.
- Press OK.
|
Updating QuickLists
To add or remove items from an existing QuickList:
- In the All View, mark a number of Items as needed.
- From the Menu, select QuickList > Update List.
- Select a QuickList name that you wish to update and press
OK.
|
Preferences
|
|
You can customize many options in SplashShopper.
Press Menu > Preferences to access the following options:
- Show Completed in Need View - Select this option
if you wish to show completed items in the Need View. Note:
if you select this option, you must manually clear the completed
items from the Need View by pressing Menu > Options > Clear
Completed. Otherwise,
when this option is turned off, items are automatically cleared
from the Need View when you check them off as completed.
- Sort Completed Items at Bottom - Select this option
if you wish to sort completed items at the bottom of the
Need View. Note: You must be showing Completed Items in Need
View (see above) for this option to work.
|
- Show Decimals in Price Column - Deselecting this option
will hide the decimal display in the price column, thereby reducing
the size of the price column in List View. Note: the actual price
is still used to calculate the Total, even when the decimals
are hidden.
- Show Total - Displays the Total of the currently displayed
items (Quantity x Price x Tax Rate). See Total for
more info.
- Mark Edited Items as Needed - If this option is selected,
any items you edit (by opening the Item Details dialog) will
be marked as Needed.
- Mark New Items as Taxable - If this option is selected,
any new items you create will have the "Tax"
checkbox pre-selected in Item Details. Note: The Tax Rate is
specified in the List Info dialog. The
tax rate will be calculated into the Total for any Items that
have the Tax checkbox selected.
|
Item Details Dialog
|
|
To create an Item, press Menu > Item >New in
the List View. The Item Details dialog appears. You may fill
in the following fields:
- Item: Enter a name (e.g., Bread, Milk, Eggs,
etc.) in the Item field using your keyboard/keypad.
- Store: Select or enter a Store (e.g., Albertsons,
Costco, Safeway, etc.) in the Store field or select --MULTIPLE--
if the Item is available at multiple stores (see Stores for
more info).
- Category: Select or enter a Category (e.g., Dairy,
Fruits, Vegetables, etc.) in the Category field.
- Custom 1: Enter a name (e.g., a description
like Whole Wheat, Low Fat, Large, etc.) in the Custom 1 field.
|
- Custom 2: Enter a name (e.g., an aisle number
like 1A, 3B, 3A, etc.) in the Custom 2 field.
- Qty: Enter the quantity you wish to purchase.
- Unit: You may select a unit description from the popup
list, or edit the list of choices by selecting Edit Units.
- Price: Enter the unit price of the item. The total
price of the item will equal Price x Qty.
- Coupon: Select this checkbox to indicate that you
have a coupon for the item. If you are showing the Coupon column,
a "Yes" will be displayed next to the Item in the
List view (see Coupons for
more info).
- Auto-Delete: Normally items that are marked as completed
in the Need view are removed from the Need view but remain
in the All view so that you can mark them as needed again in
the future. Select Auto-Delete if you want to automatically
delete the item once it has been marked as completed in the
Need view. This is convenient for one-time purchase or
on-sale items.
- Tax: Select this checkbox to indicate that the Item
is taxable. Note: You must set a Tax Rate in List
Info, if you wish to calculate tax into the Total cost
(Qty x Price x Tax Rate) for all items marked as taxable.
- Note: Press the Options key and select Note if you
wish to view or enter a Note.
|
Multiple Stores with "Track Per-Store Prices" Off
Multiple Stores with "Track Per-Store Prices" On
|
|
The Store Menu is similar to the Category menu,
in that it can be used to filter the view to only show Items
assigned to a specific Store. But unlike Categories, you can
assign multiple Stores to a single Item. For example, an Apple
can be assigned to only one category (Fruit) but it can be assigned
to multiple Stores (Safeway, Albertsons, Costco, etc.). In addition,
if desired, you can track prices on a per-store basis, in order
to determine which store offers the best overall value.
To assign an Item to multiple stores, select "--MULTIPLE--"
from the Store Menu to display the Stores dialog where you can
assign up to eight stores for an item. If you select "Track
Per-Store Prices" in the List Info dialog,
additional columns will appear allowing you to track Aisles
(Custom 2) and Prices on a per-store basis.
You may use the Store Menu on the top left of the List
View to filter the list by Store. When viewing All Stores,
and "Track Per-Store Prices" has been selected in
List Info, the lowest priced entry (Store name, Aisle and Price)
will be displayed. If you select a specific Store from the
Store Menu (e.g., Safeway), the list will display only Items
available at that Store, and the selected Store's Aisle and
Price will be displayed. If it is not the Store with the lowest
price for that Item, the store name will be displayed with
an asterisk (*).
|
You may select the Coupon checkbox in Item Details to
indicate that you have a coupon for an item. If you are showing the
Coupon column, a "Yes" will be displayed next
to the Item in the List view. You may use the Coupon checkbox as a
general means of marking items that are on sale or, if you are tracking
prices, you can use the coupon to track the amount of the discount
as follows:
- For general purposes: Mark an existing item with the
coupon checkbox, then show coupons in the List View as a visual
reminder that you have a coupon for that item.
- Or, for tracking the amount of the discount: Create
a new Coupon Item (e.g., Cola Coupon) with a negative Price (this
will reduce the Total amount displayed at the bottom of the List
View). You may also wish to mark the Item as Auto-Delete, since
the coupon will no longer exist once you use it.
- Or, for recording the amount of a discounted item:
Create a new Item (e.g., Cola) and give it a price equal to its
normal price minus the discount. You can mark the Coupon checkbox
as a visual indicator that you have a coupon or it's on sale, and
you may mark the Auto-Delete checkbox, since the item will no longer
be on-sale once you redeem the coupon.
Normally, items are not deleted from SplashShopper and
remain in the All View so that you can easily add them to the Need View
in the future. However, you may delete items that you no longer want
to keep in the All View, as follows:
Deleting a single Item
Select an item in the List View, then press Menu > Item > Delete.
From the Item Details dialog, press Options > Delete.
Deleting a group of Items
You may delete all items that are not needed, as follows:
- In the All View, select a category that contains the
items you want to delete.
- Mark the items you want to keep as needed, and the
items you want to delete as unneeded.
- Press Menu > Options > Delete Unneeded.
Auto-Delete
Normally, items that are marked as completed in the Need view are
removed from the Need view but remain in the All view so they can be
marked as needed again in the future. Select Auto-Delete in the Item
Details dialog if you want to automatically delete the item from the
All view once it has been marked as completed in the Need view. This
is convenient for Items purchased once only, or on-sale Items.
SplashShopper Desktop is a Windows desktop application
that provides identical functionality to SplashShopper on your Smartphone
plus some added features. Information is synchronized between SplashShopper
on the Smartphone and SplashShopper Desktop. You may find it more convenient
to enter your items in SplashShopper Desktop using your keyboard and
mouse, and then synchronize the data
with SplashShopper on your Smartphone. SplashShopper Desktop is very
similar to SplashShopper on the Smartphone, with the added ability
to copy/paste, print and import/export as described below.
You can select multiple Items in SplashShopper desktop
by clicking Items while holding down the control or shift key. Then
you may copy the Items to the clipboard and paste them into another
list. Or you may copy/paste Items between Users if you are syncing multiple
Smartphones with the same desktop by switching between users in the User
Menu.
You may print your shopping lists from the desktop by
selecting Print from the File Menu. SplashShopper will print whatever
is displayed on screen. You may wish to customize the print format by
hiding or showing columns or adjusting their width.
You can share information with other SplashShopper Desktop
users by exporting and importing your SplashShopper records. Records
can be exported/imported in several formats:
SplashShopper vSH
You may import and export SplashShopper records in SplashShopper virtual
shopping list (vsh) format, which allows you to easily export and
import shopping list items and share them with others. vsh files are
a convenient way to share records with a coworker or spouse by exporting
a vsh file and then emailing the resulting vsh file to the recipient.
You can even use the vsh format as a backup mechanism by periodically
exporting all of your lists in vsh format and archiving them on a
backup disk.
To create a vsh file, simply display the Items that you
wish to export (e.g., All View, Need View, a specific Category or Store,
etc.), then select Export/vsh from the File Menu. In addition to the
Items that are exported, all of the List Preferences (columns shown,
field names, tax rate, etc.) are also contained in the vsh file. The
recipient of the vsh file may open the file by double-clicking it
or selecting Import/vsh from the File menu. When importing a vsh
file, you have the option of creating a new list (which contains all
of the pre-defined preferences) or importing just the records into an
existing List.
You can download and upload sample vsh files as well as
share tips and tricks with other SplashShopper users on the SplashShopper
User Group at:
http://groups.yahoo.com/group/splashdata/
CSV
You may also import and export SplashShopper records in CSV format.
CSV stands for Comma Separated Values, and is a common file format readable
by most spreadsheets, databases and word processors. If you wish to
import a CSV file, the data must be in the following format:
Needed, Item, Store, Category, Custom1, Custom2, Qty, Unit,
Price, Coupon, Auto-Delete, Tax, Notes
-
Needed = N for Needed, C for Completed, or blank for neither.
-
Coupon, Auto-Delete and Tax are marked with an X if the value is
true.
-
Store, Custom2 and Price may contain multiple values separated
by semi-colons (;) if that Item is assigned to multiple stores.
It is easy to create the above format in Excel by creating
a spreadsheet with 13 columns (as described above) with one record per
row. Then save the file in CSV format.
Third-party import filters
You may easily import data from another app by using one of the
provided third-party import filters as follows:
-
HandyShopper PDB -- To import a HandyShopper PDB file, simply
select Import/HandyShopper PDB from the File menu in SplashShopper
Desktop, then select the HandyShopper PDB from the C:\Palm\<username>\Backup\
folder. SplashShopper will create a new SplashShopper List from
the HandyShopper PDB.
-
HandyShopper CSV -- To import a HandyShopper CSV file, create
a HandyShopper CSV file using the HandyShopper hs2convert.exe following
the instructions provided with that application. Then, import the
CSV file by selecting Import/HandyShopper CSV from the File Menu
on SplashShopper Desktop.
-
HandyShopper TXT -- To import a HandyShopper text
file, choose Export to MemoPad from within HandyShopper to create
a MemoPad export file. Then synchronize with the desktop so the
MemoPad file is copied to the desktop. Then, copy the text from
the MemoPad file on the desktop and paste it into a new Text file.
Last, import the Text file by selecting Import/HandyShopper TXT
from the File Menu in SplashShopper Desktop. Note: The HandyShopper
Export to MemoPad feature does not export Stores. If you wish to
import Stores from HandyShopper, you must use the HandyShopper PDB
or CSV option above.
-
PDA Cookbook TXT -- To import a PDA Cookbook text file,
create a HandyShopper MemoPad Export file using the instructions
provided with PDA Cookbook. Then synchronize with the desktop so
the MemoPad file is copied to the desktop. Then, copy the text from
the MemoPad file on the desktop and paste it into a new Text file.
Last, import the Text file by selecting Import/PDA Cookbook TXT
from the File Menu in SplashShopper Desktop.
Note: When importing a file, you are asked whether you want to create
a new list from the file, or import the data into an existing list.
SplashShopper data is stored on both the Pocket PC and the desktop,
and each acts as a backup of the other. So, in theory, if you lose
the data on one of these devices through a catastrophic event (e.g.,
hard drive failure), the data will be restored to that device from
the other device during your next sync.
Manual vsh Backups
It is recommended that you perform a manual backup of your data
by selecting Backup from the File menu. This will export your SplashShopper
List in vsh format to whatever location you select.
Restore
Select Restore from the File menu to restore a vsh file that has
been backed up either automatically or manually as described above
and you will be prompted to either import the data into an existing
list or create a new list from the data.
Desktop
The SplashShopper Desktop database files are automatically saved
to the SplashShopper directory on your hard drive each time you exit
the application. Each List is stored as a separate file. You may back
up these files as an added precaution in case of a hard drive failure.
To restore one of these backed up files simply copy it back into the
SplashShopper directory. Then the next time you launch SplashShopper
it will open the file. These files are stored here:
|